Creativity can be messy and chaotic. It’s often more important to quickly get ideas down when you’re in the flow than to keep things tidy. Yet, once you get to the mixing stage, keeping order in your Live Set helps you to mix more efficiently. The more tracks you have in your Live Set, the more important this becomes.
Don’t worry, I’m not saying that you need to spend huge amounts of time making everything look neat and tidy. There are a few things you can do in just a few minutes that can give you much more clarity in mixing.
Naming Tracks
Ideally, you’d do this right when you create a new track, because then all subsequent clips you record on this track will be named accordingly. I sometimes forget to rename tracks though when my creative output is high. To be honest, I don’t mind, as naming clips generally isn’t very high on my list as long as tracks are labelled.
If you use hardware synths, drum machines or effects, it can be very useful to add the used preset and other relevant information to the track title.
Use Cmd + R (Mac)/Ctrl + R (Win) after selecting a track to rename it and then use the Tab key to move on to the next track. Keep the # in the beginning for automatic track numbering.
Reordering & Grouping Tracks
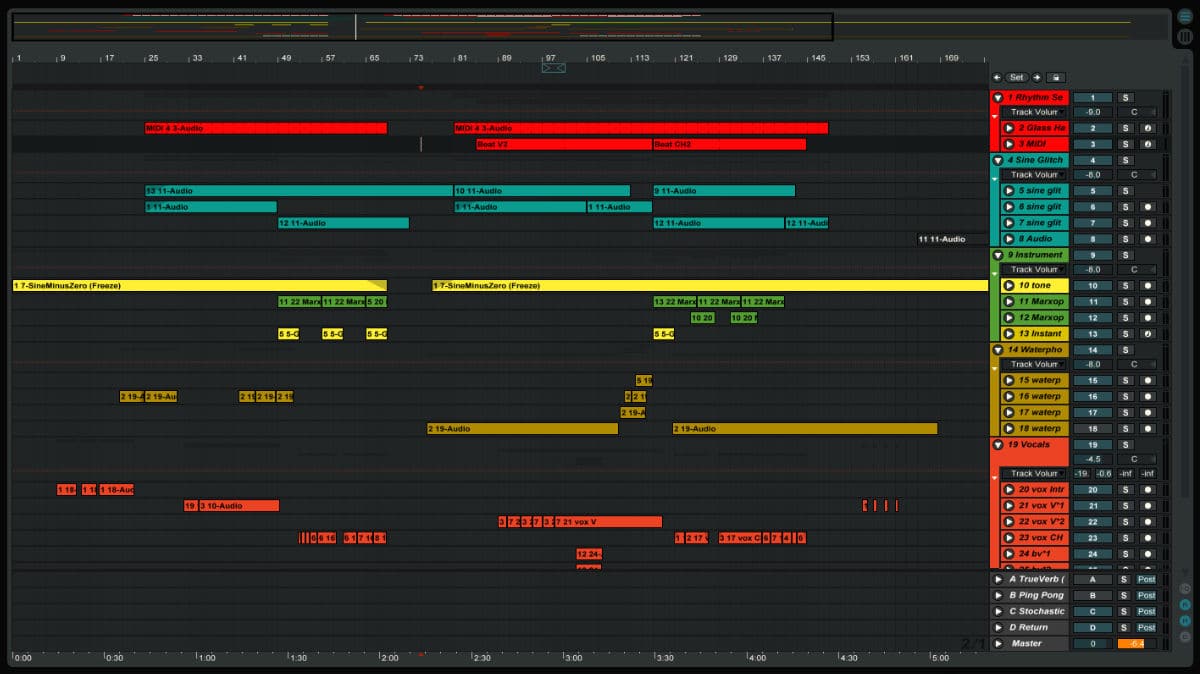
Now, that all tracks are properly named, it’s time to order the tracks by drag and drop in a way that makes it easier to mix them. First I delete all obsolete tracks after checking that I don’t have important clips in them in the Session View. Tracks I’ve resampled, but want to keep for reference, I move muted to the bottom.
I keep all beats, percussion and bass tracks next to each other. The same I will do with other instruments or instrument groups as well as vocals. I will also group these tracks, so that I can work on individual submixes in which I’ll mix the tracks in relation to each other, before I’m only left with balancing the submixes with each other.
Select the tracks you want to group together and press Cmd + G (Mac)/Ctrl + G (Win).
Colour Coding
Tracks and clips can be colour coded in Live. Make use of this feature as it’s quick and easy to bring visual structure to your Live Set. I utilise specific colours for specific instruments or instrument groups. E.g. vocals are orange which means I will make both the clips and tracks for vocals orange. Depending on the amount of vocal tracks, I might use different shades of orange to distinguish between different vocal tracks.
I also use colour codes for clips that still need to work on, most often black, grey or white. I mark vocal clips black that I haven’t de-essed yet, so even if I’d been working late at night and don’t remember where I left off, I only have to take one look next time. Of course, everyone should make up their own colour codes as our association of sounds to certain colours will certainly differ.
Right-clicking a track title or clip will show the context menu with the colour choices at the bottom. If you select multiple clips or tracks, you can colour code them in one go.
As you can see, using the shortcuts this can easily be done in five to 1o minutes and can make all the difference for a smooth going mix.
If you have any questions to ask or other tricks to share, please do so in the comments.








3 responses
Excellent suggestions! I use them all. It seems all the suggestions deal with the vertical arrangement of tracks in arrangement view.
I have found that the use of locators along the timeline greatly speed up my ability to mix sections rather than searching through for the correct bar number or position in the song. Setting locators at the beginning of major sections and right clicking a locator and renaming it allows you to quickly identify the verse, chorus, breakdown, solo, whatever… which allows for quick duplication of any automation throughout like sections throughout the piece.
what is the skin used in the picture? that is amazing
I’m not sure, but it’s definitely one of these: https://sonicbloom.net/sonic-bloom-ableton-live-skins-mega-pack-50-free-skins/.