Clip automation in Ableton Live’s Session View was introduced in Live 10, allowing you to automate parameters directly within clips rather than relying solely on the Arrangement View. This change was long overdue for those using Live for live performances, as it makes the software much more versatile on stage.
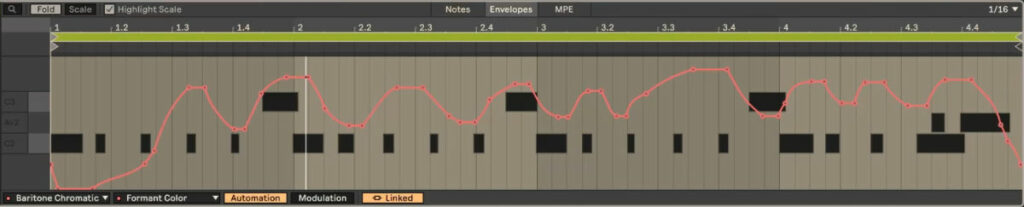
Since its introduction, Live has undergone several updates, refining the Clip View interface and enhancing the automation workflow. In Session View, a dedicated Envelopes tab has been added to clips for automation and modulation.
Watch the Video:
Chapters
00:00 Intro
00:30 How to Record Automation
02:03 Touch or Latch Behaviour While Recording Automation
02:42 Record Automation in Armed Tracks or All Tracks
04:48 Where to Find Automation in Clip View
05:34 Simplify Envelope
06:04 How to Delete Automation
06:43 Select Shapes to Insert for Automation
07:10 Copy (or Cut) and Paste Automation
07:47 Modilfy Automation (Shrink, Stretch or Skew)
09:06 Add, Move or Delete Automation Breakpoints
10:03 Add Automation Curves
10:32 Edit Breakpoint Values
11:01 Using Draw Mode
11:52 Quickest Ways to Access Automation for a Parameter
13:12 Drawing in Automation & Grid Settings
15:11 Disabling & Re-enabling Automation
16:07 Unlinked Automation (Longer Automation than Loop Length)
18:10 Automation vs. Modulation
20:00 Automation from Session View to Arrangement View
There are various ways to create clip automation. One method is to record automation in real time by enabling the automation arm, arming the relevant track and activating session record. If you use the mouse to record automation, Live uses touch behaviour, stopping recording as soon as you release the mouse button. If you are using a MIDI controller, automation is recorded with latch behaviour, continuing until the end of the clip’s loop regardless of whether you continue changing the parameter values.
In Live’s Preferences, under the Record/Warp/Launch tab, you can specify whether to record session automation in Armed Tracks only or in All Tracks. It is set to armed tracks by default, which is generally the best setting so that you won’t accidentally record automation. However, at times you might want to record automation to various clips, in which case the All Tracks setting might be best.
Once automation has been recorded, you can tidy it up using the Simplify Envelope command. You can also remove automation using Clear Envelope or Clear All Envelopes. If you want to reuse or move automation curves, you can use Cut Envelope or Copy Envelope and then paste using Ctrl+V or Cmd+V. All these commands can be accessed via the context menu in the Clip View’s Envelopes tab.
The Insert Shape command, which can be found in the context menu as well, allows you to quickly apply pre-defined automation shapes. You can also manually add, move or delete breakpoints for greater precision.
Using the Draw Mode and adjusting the grid setting helps you to create step-based or free-flowing automation curves. Clicking on a parameter in the device or mixer automatically selects it in the Device Chooser, allowing you to immediately start drawing or editing automation.
To create smoother transitions, hold Alt (Option on Mac) while adding a curve between two breakpoints. You can also edit the value of a breakpoint directly to add a precise value, or scale, stretch or compress automation curves after selecting them or a portion only.
If automation is overridden during playback, you can re-enable it either globally via the top control bar (arrow pointing left right next to the Capture button) or per parameter by right-clicking and selecting the relevant option from the context menu. To declutter the view, you have the option to only show adjusted envelopes.
In Session View, automation can be linked to the clip’s length or unlinked to allow for longer or more complex patterns. By default, the automation length is linked to the clip’s loop length. To unlink it, click on the Linked button. Now you will have access to define the start, position and length of the automation in looped clips, or start and end in unlooped clips. Additionally you will find a Loop Switch for the automation right next to the Linked/Unlinked toggle, which is on by default for looped clips only. It allows to uncouple looping of the automation from the clip if desired or vice versa.
It is also important to understand the difference between automation and modulation. The former refers only to absolute parameter changes over time, while the latter refers to relative changes applied to existing parameter values. This means that you can automate a parameter, while also adding additional modulation applied in relation to the values set by the automation curves. The modulation values are then added or subtracted from the automation values respectively.
Finally, when you record or move clips into Arrangement View, the clip automation will be carried over, but will no longer be accessible in Clip View. Instead, it will show up in automation lanes when you activate Automation Mode using either the dedicated button or the ‘A’ key on your computer keyboard.
Related Tutorials
If you have any questions or you think I forgot to mention anything, please let me know in the comments below.