There are plenty of reasons why you might want to resample to audio in your music productions. Perhaps you’re working with CPU hungry plug-ins. Or you’d like to commit MIDI to audio to use audio specific features like warping, reversing, slicing or resample effects with randomised features. It can also be a good way to avoid fiddling endlessly with details. The waveforms can also be used as a visual aid.
Now, Ableton Live is known for its varied routing options and these allow for different approaches to resampling audio. We’re going to look at how each method works and what its pros and cons are, so that you can always choose the best possible option for the task at hand.
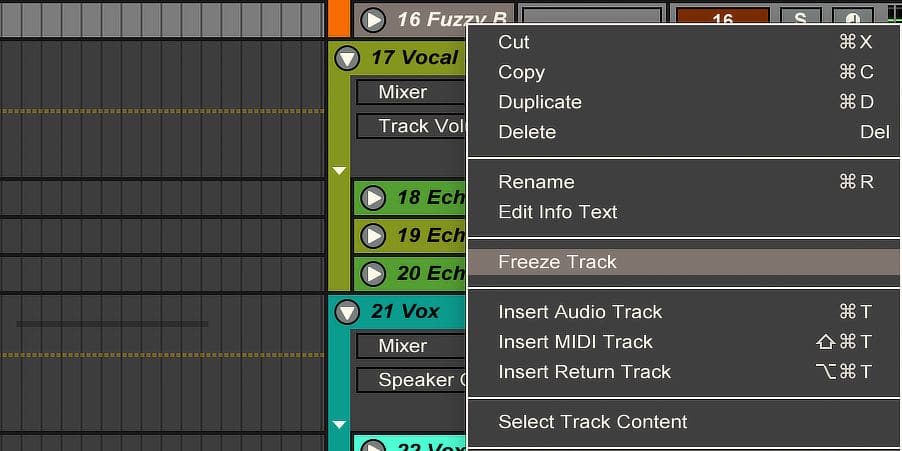
Freeze & Flatten
Freeze Track is a feature in Ableton Live to help you save CPU. Using it renders pre-fader bounces of the track’s output signal including all devices and automation; one bounce for the Arrangement View, and one for each clip in the Session View. A frozen track no longer allows editing clip settings, device parameters or automation. This is indicated by a blue hue over all the disabled elements. Mixer controls such as volume, panning, and send amounts are all still available to adjust or automate. You can use Unfreeze Track to undo it and get access to the disabled parameters again.
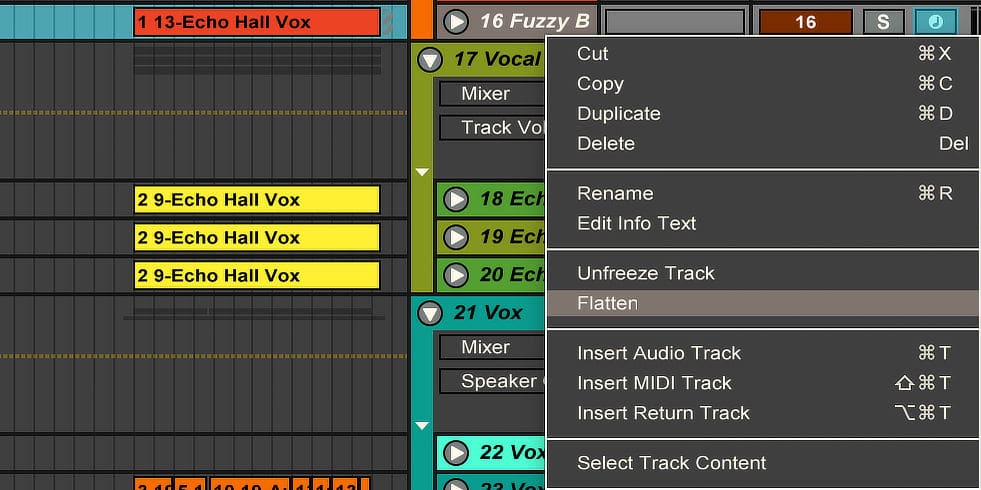
There is also the Flatten feature in Ableton Live, that in combination with Freeze can be used as way to resample. It completely replaces the original clips and all devices with a new audio file. The rendered results include any device or clip settings and automation.
How to:
- Right-click the track you want to bounce and select Freeze Track from the Edit menu.
- Right-click the track again and select Flatten from the Edit menu. Alternatively, you can create a new audio track and drag the frozen audio to it.
Pro:
- quick and easy way
Con:
- renders audio in 32 bit, not the bit depth that is set in Live’s Preferences
- frozen clips played back and rendered with Warp on and in Beats Mode (may change sound)
- doesn’t work with Group Tracks
- no effect tails in Session View clips
Resampling
Ableton Live offers a Resampling feature that you can find in the dropdown menu for the input routing for each audio track. It records whatever is put out from the master track.

How to:
- Create a new audio track.
- Select Resampling from the track’s Audio From dropdown menu.
- Arm the track.
- Solo the track(s) or group(s) of tracks you wish to resample. Alternatively you can mute the tracks you’d like to exclude.
- To begin recording:
- in the Arrangement View, click ‘Arrangement Record’ in the transport section at the top of Live.
- in the Session View, click on the little round record icon of the chosen clip slot.
- Press the space bar to stop recording and playback.
Pro:
- resample multiple tracks into one
- all effects and track settings from track, group track, master channel and return tracks the activated track(s) feed into
- monitoring the output is possible
Con:
- real-time process
- easy to make mistakes in what is recorded
Routing & Recording
Another way to resample audio is to simply route the audio of the track you’d like to resample into another one and record it. I use this method fairly often when I’m working with glitch and randomised effects to capture the momentary output and later choose the versions I like best.

How to:
- Create a new audio track.
- Select the track or group track you’d like to resample from the track’s Audio From dropdown menu.
- In the dropdown menu below, choose:
- Post Mixer (with effects, with mixer settings),
- Pre FX (without effects, without mixer settings),
- or Post FX (with effects, without mixer settings).
- If you want to resample a group track, the effects on the individual tracks will always be included unless you deactivate them separately.
- Arm the track.
- To begin recording:
- in the Arrangement View, click ‘Arrangement Record’ in the transport section at the top of Live’s interface.
- in the Session View, click on the little round record icon of the chosen clip slot.
- Press the space bar to stop recording and playback.
Pro:
- good control over what is resampled
- monitoring the output is possible
Con:
- real-time process
- multiple tracks can only be resampled within a group
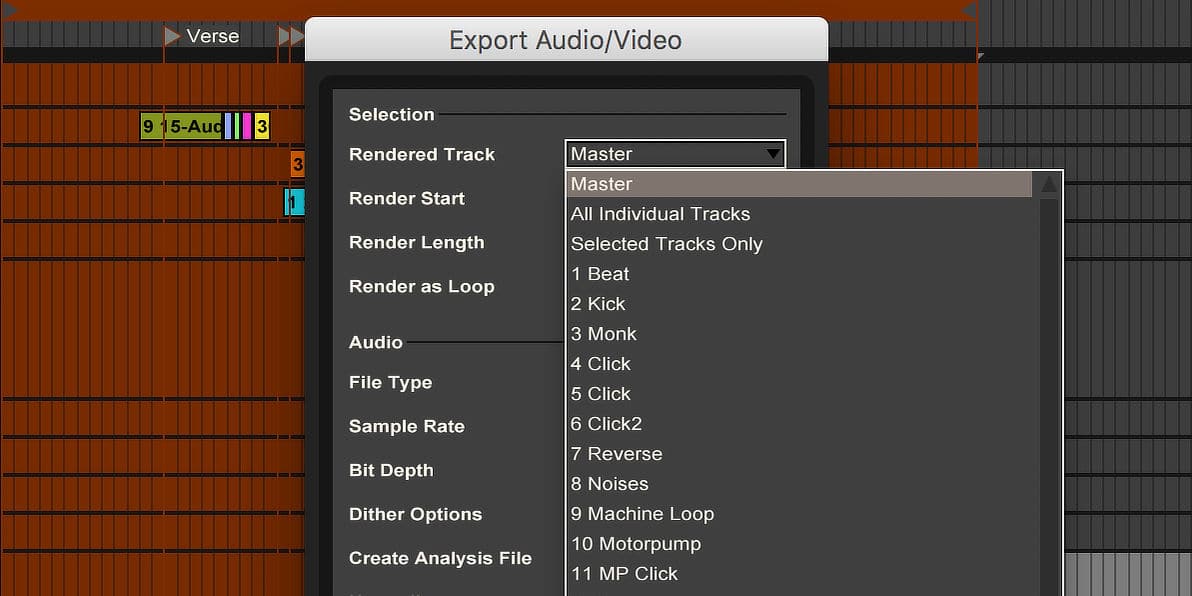
Audio Export
And then of course, there’s also the audio export function in Live. I’ve written an in-depth tutorial about it, that you can have a look at if you’re unsure about how it works.
Pro:
- faster than real-time
- possible to automate rendering multiple tracks
Con:
- needs to be reimported into the Live Set (chance of file loss if Collect All & Save isn’t employed)
- no monitoring of output during the export
I hope this tutorial helps you choose the right method. If you have any questions or suggestions, please leave me a comment below.


17 responses
Thank you for your knowledgable articles, I appreciate them a lot. Keep up your exceptional work.
Have a great day.
This is one of the main reasons I’m thinking about doing sound design in Logic (doing song writing and production in Live). Logic’s bounce in place and render selection options are way easier and quicker to use.
Try for a bit and see how you go, I guess. I moved to Logic for a while, but missed too many features in Ableton Live again. No DAW’s perfect, unfortunately.
Madeleine, this is great. I use this functionality a lot. I was wondering if you could do some tips and tricks with your native SB and MaxForCats devices. Any tricks with any of your own devices that you could share with us? As developers of your devices you and Kleine must have some knowledge bombs to share. Thank you for your offerings AND congrats with the LOOP spot!
Sure, I’ll see what I can come up with and think others would probably find this interesting as well. Thanks.
Hey! Great article as always. One thing you missed though about resampling (live) is that as it’s recording down, you can real time tweak some of the un-automate-able parameters in Ableton (e.g. Grain Size when in Texture mode). Resampling is a great way to really quickly capture some off kilter ideas.
Thank you. You’re right. It’s not in there, but I hadn’t forgotten. Since the “Explorations” idea went down so well with the effect chains, I thought I’d do one for resampling as well.
You can modulate those parameters (Transposition, Grain Size, Flux, Sample Offset) for a Clip via the Clip’s Envelope Box. Also changes made to an audio Clip via Warping (also Clip Fades) can be quickly bounced using Consolidate in Arrangement View.
Nice tips!
Also, we can do such a thing with Ableton Looper device.
We can record everything we want, and then drag and drop result from looper into the audio track with “drag me!” function.
So at the end of the day which technique do you find yourself using most often?
Generally routing & recording. This way I can listen to the result and if it’s something to be edited down further I can take notes which bits to keep.
Your article is very useful. It’s really helpful and informative.
Thank you Maddie! It’s rare to find compacted information like this that actually helps me in making a decision. You rock!!!
Hi there, curious which you think is best for this specific use case: I’d like to run a midi clip out through External Audi Device to a physical pedalboard, then print the effected signal to a new clip that I can also use in Session view (I haven’t gotten to arranging this track yet).
I’d also like the new clip to somehow include any reverb/delay trails from the pedalboard, but I still want to clip to loop at its original length.
I’m obviously very confused.
Have a look at the Render as Loop function in the Export window. It does exactly what you want.
You forgot to mention that the Looper Ableton Live device can resample as well if you configure it correctly.
You’re not wrong, but the scope of resampling I wanted to cover in this article doesn’t lend itself to using the Looper as I was more focused on resampling longer parts. The Looper is best for shorter ones.