In Ableton Live, you can have only one Live Set open at any given time. So what if you want to merge two or more Live Sets or use parts of one in another Set? This can be necessary if you have different versions of a song/track you want to combine or when creating a Live Set for playing live. Luckily you don’t need to have a Live Set open to be able to use its tracks in another Live Set. Live’s built-in File Browser gives you easy access to complete or individual parts of Live Sets.
Merging complete Live Sets
-
- To avoid messing up an existing Live Set, it’s best to either start with a New Live Set (Ctrl + N on Windows, Cmd + N on Mac).
- Now click on Add Folder in the bottom left of the Browser and choose the parent folder of the two Live Sets you’d like to merge. If they are in different locations, simply add both Project Folders individually. The added folder will be accessible under Places in the Browser.

-
- Select the folder and in the second column of the Browser navigate to the als-file of the desired Live Set and drag it onto any Track Title Bar of the new Set. This will recreate the complete Live Set including all clips in Session and Arrangement View, its used devices, routing and automation. Only Return Tracks and the Master Track will be ignored.
- You can continue adding more Live Sets by dragging and dropping them onto the Track Title Bar area next to the already created Tracks in the same manner. Do not drop them on the Track Title Bar of an already added track unless you want to overwrite it.

-
- Once you’ve merged the Live Sets into the new one, don’t forget to save it with Ctrl + S (Win)/ Cmd + S (Mac). Make sure, you don’t save it in an existing Live Project folder or the Live Library to avoid missing samples later on.
- If you don’t want the folder shown under Places anymore, simply right-click it and choose Remove from Sidebar.

Merging individual parts of Live Sets (Tracks, Clips & Grooves)
-
-
- Again start with a New Live Set (Ctrl + N on Windows, Cmd + N on Mac).
- Add the parent folder that contains all the Live Sets that you want to use individual parts from via Add Folder in the Browser in Live or add the Project folders individually.
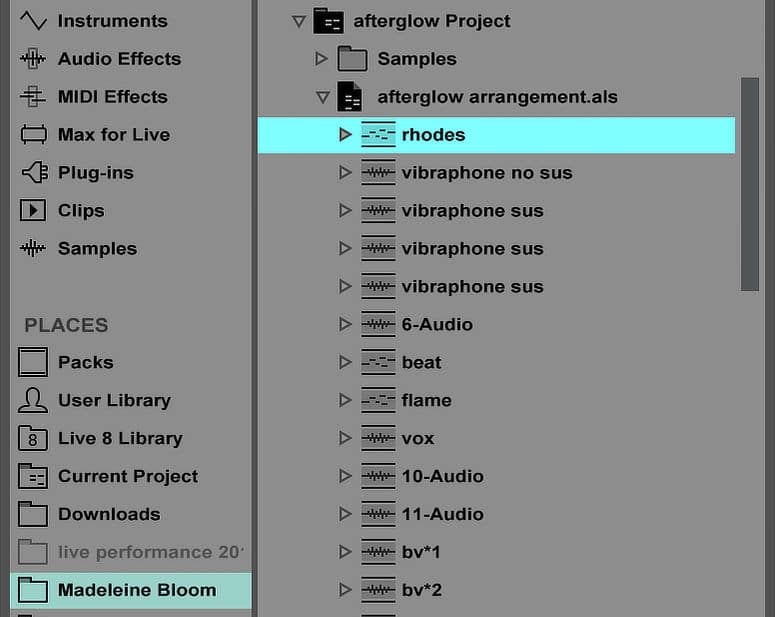
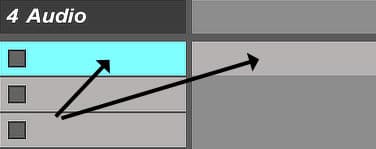
- Once you’ve located the als-file of the first set in the second column of the Browser, unfold its tracks by clicking on the little triangle to the left of the name. If you want to add one or more tracks with all their clips in Session and Arrangement View, highlight, then drag and drop them onto the Track Title Bar of the Live Set.
-
-
-
- If a track contains any Session View Clips, a triangle will be shown to the left of the track title that can be used to unfold the separate clips. To add Session View Clips, highlight, then drag and drop them onto the Clip Slot area. All devices, routings, automations from the Track it originally belonged to will be recreated as well.
-
-
-
- You can also preview Session View Clips directly in the File Browser. Make sure the headphones icon at the bottom left of the File Browser is turned on. Highlight the clip, then click on ‘Click to Preview’. This works for both audio and MIDI clips.
-

-
-
- Once you’ve added all tracks and clips as desired, don’t forget to save it with Ctrl + S (Win)/ Cmd + S (Mac). Make sure, you don’t save it in an existing Live Project folder or the Live Library to avoid missing samples later on.
- If you have used Grooves in a Live Set and want to use them in another one, unfolding the Live Set will reveal the Grooves folder which in turn can be unfolded. Now you can drag and drop a Groove directly onto a Clip.
-
If you have questions or remarks on this tutorial, comments are always appreciated.
There are plenty more Ableton Live tutorials where this one came from.


One Response
I actually needed to do this previously but had no clue. This seems so simple but I’m so new to this software and music making that i had no idea this could be done. Thanks for such a clear explanation. I’ll be able to do this next time!