Over the last two weekends I had the chance to borrow an Ableton Push. I’d like share my first observations and experiences with you so hopefully you can make a more informed decision if Push’s the right thing for you.
Editor’s note: Due to the lenghtiness of my review, I’ve split it in two parts and added Pro and Con for each section to make for better reading.
Ready, set, go
When you plug in Push, it’ll tell you to start Live to play. You comply and Push is automatically recognised. Not only that, Live shows a pop up window asking if you want to start a song. If you deny, it opens an empty Live Set and you can choose if the pop up should reappear next time or not.
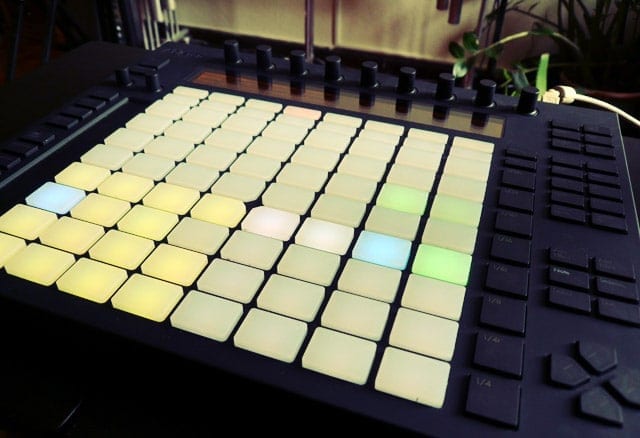
If you accept, a Live Set with three MIDI tracks opens, one with the Core 909 Drum Kit, one with a bass, one with the grand piano preset. The 909 track is armed and you see the layout for Drum Racks on Push with the step sequencer in the top half, the Drum Rack pads in the bottom left, controls for the loop length on the bottom right.
Beat Creation
Creating drum patterns with Push is very easy. You can either use the step sequencer or record a clip and drum them out on the pads. I’m not gonna go into detail how it works, but it’s simple and very intuitive so you should quickly get the hang of it. Just beware of accidentally pressing the bottom right 8 pads. They control loop length settings and can move the focus to a part outside of the loop. This happened to me a couple of times and I found it very confusing until I sussed how this had happened.
The drum layout of Push only works with Drum Racks. If you load an Impulse preset, the default key layout is shown. I personally love working with Impulse because of its time stretching, filter and envelope capabilities. It’s perfect for creating drum kits out of field recordings. I would love to see the drum layout also work with Impulse, but there’s no indication that Ableton will stop neglecting Impulse any time soon.
Verdict:
+ step sequencer and drum pads in the same layout making them easily accessible
+ easy and intuitive
– drum layout not implemented for Impulse
The Key Layouts
Tracks are automatically armed when selected with the arrow keys on Push. Once you select one of the instrument tracks, the key layout appears. By default, it’s set to C Major (Fixed Mode off). It’s easy to switch to another one via the Scales button. The key is chosen for the whole Live Set, but isn’t saved with it. Neither is the setting saved in Push, so whenever you start Live and Push or just a new Live Set, it’s back to Cmaj.
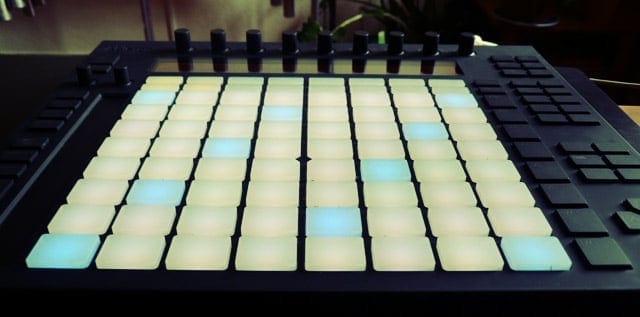
I like changing the key mid song, so I chose the Chromatic Key layout. While the In Key layout is easy and fun to play and offers a lot of choices (also exotic – as in non-western – keys), the chromatic one isn’t. I had serious trouble wrapping my head around playing. This is the case because it uses the same grid arrangement as In Key, but includes all notes. Going back to a piano, array mbira or guitar (that all have different layouts) seemed the better option. In my opinion, the chromatic layout could do with an overhaul. I have some ideas I want to pursue in this regard and maybe this will result in a Max for Live device in the end.
I can’t say much about the pads as the Push I tried is a prototype where they were still figuring out the right feel of the pads. You can adjust the sensitivity to your liking. However, the options for velocity curves seemed a little off, but that could be fixed in as software update. After I played for a few hours I got “claw hands”, partly because the sensitivity of the pads were differing greatly for different presets sometimes resulting in me almost banging them aggressively, but also due to the triangle shape of chords in Push’s In Key mode. I’d love to know if this feels different in the finished version.
Verdict:
+ playing and recording in In Key modes is easy, fast and therefore fun
– chosen key not saved with Live Set or in Push settings
– Chromatic Key mode seems cluttered and not well thought through

Browsing Sounds
I didn’t quite like sound choices of the default Song Live Set, so after playing and recording some drum patterns and melodies I wanted to change the presets. Pressing Browse opens the Live Library with all the Instrument presets organised by device and you can use three of the encoders to navigate to one you like. In theory, this is simply enough as well, unless you want to access your own presets.
You basically have two choices how they can be displayed depending on the arrangement in the User Library: loosely or in a folder called ‘Others’ inside the respective device folder. Always also showing the adg ending. Both seemed rather unsatisfying for a fast workflow, so I looked into hacking (until I remembered I only had Push for the weekend).
The real issue isn’t Push though, but the Browser in Live 9. Searching the net showed that a lot of users have the same complaint which means that hopefully Ableton will listen and provide us with the necessary improvements in a future update. As much as I applaude Ableton for overhauling the Browser/Library structure and like most of the ideas behind it, the new one still needs a lot of work.
Verdict:
+ browsing Core Library presets
– browsing User Library presets
There’s a lot of things Push does well, but there’s still room for improvement. The great news is that all those mentioned here are software related that could be added with Live 9 updates.
Do you already own Push? What are your experiences with it? If not, do you plan to get one or not and why? Discuss. 🙂
More on Ableton Push.


2 responses
Hi Madeleine, Deine Besprechung ist sehr informativ und angenehm kritisch. Ich bin wirklich sehr gespannt, wie sich das Teil anfühlt und spielt wenn es denn in 6-8 Wochen da ist. Da ich Non-Keyboarder bin freue ich mich auf den Scale-Modus und die Möglichkeit der “Akkord-Dreiecke”. Aber Du hast sicher Recht, was den Chrom. Modus angeht und die erweiterten harmonischen Bedürfnisse. Dass die gewählte Scale nicht mit dem Set gespeichert wird sollte unbedingt seitens Ableton überdacht werden. Aber es ist doch wohl so, dass die eingespielten Noten in eben dieser Scale als Midinoten gespeichert werden. Als ein anderes Konzept als das Scale-Midi-Plugin? Bleibt zu hoffen, das sich am Browser noch einiges tut. Das ist schon wichtig. Bin auf den 2. Teil Deiner Besprechung gespannt! Grüße, Tonwelle
Danke Dir. Der zweite Teil kommt am Mittwoch. Ist ganz schön viel Text, den ich in zwei Sprachen schreiben muss. 😉
Die MIDI-Noten werden wie gewohnt in die Clips geschrieben, das stimmt. Aber es ist etwas verwirrend, wenn man das Set öffnet, was neues spielt und es passt nicht, besonders für Anfänger. Scale verändert eingehende Noten in der Tonhöhe, im in Key auf Push sind Noten außerhalb der Tonart versteckt.