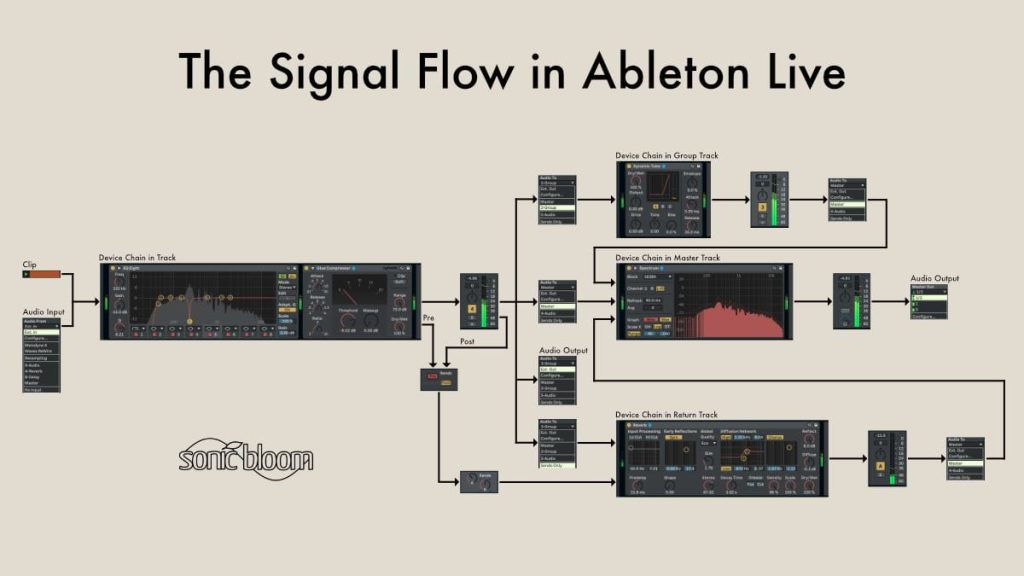
I see a lot of posts in Ableton Facebook groups that make it clear that the poster doesn’t understand the signal flow in Live. The signal flow is the path that the audio signal takes from the input to the output. Why is this important? Well, in between you have Ableton Live which allows for pretty complex routings and you need to know where the audio is affected in which ways to make the right mixing decisions. The signal flow within an Live track is still fairly simple, as I’ve already explained as part of my gain staging tutorial, for which this knowledge is also vital. It can become complicated quite quickly if you make use of the sends, groups and the flexible routing options. Since a picture is worth a thousand words, I’ve created a graphic that you can pull up when needed or use as a background wallpaper on your computer.
A quick walkthrough:
The input comes either from an audio input, which can be an external source or another track in Live, or a clip. It then moves from left to right through the device chain on the track, then through the mixer section with panning and volume settings, then out through the designated output. Then it forks off depending on the output setting to another track or group track in Live, the Master, an external output or the Sends. Except for the case when it’s sent to an external output, it again runs through the device chain on that track, through its mixer section and then to the set output. What isn’t shown in the diagram is when an Audio From setting is used in a track. Then it takes the audio from the output of the set track as an input, while the rest remains the same.
If you’re using the Sends, the signal path depends on the Pre/Post Toggle setting for each that you can find in the Session View in the Master track parallel to the Send dials. Pre and post is short for pre fader and post fader. This means if Pre is on, that the audio will bypass the mixer section of the track and be sent straight to the corresponding Return Track. The default setting for it is Post, which means the audio is tapped after the mixer section of the track and only then sent to the Return Track.
I hope you will find this graphic helpful. Let me know if you have any comments.


12 responses
Hi,
Thanks for this article! I humbly believe there’s a tiny mistake though: there shouldn’t be any arrow linking the “sends only” box to the “device chain in return track” box, since the link to the return track is anyway already done via the pre/post selector you draw.
What do you think?
Cheers,
Moussa
Technically yes, but I wanted to emphasise what “Sends only” does, because it seems to confuse some users.
Hello!
Confusion about a metering phenomenon has led me to your handy diagram (thank you for constructing this!), but unfortunately I am still confused. Maybe you know an explanation. I have an audio track with an amp in the device chain. The track has only one active send which is up 100%. If I observe the level meter of the corresponding return track I see a boost in level when activating the amp and a drop when deactivating it. The part I don’t understand is that, when monitoring input, there is no boost/drop observed in the actual tracks meter. It can only be seen in the return tracks meter. When playing a clip however, the devices’ effect on the level can be seen on both the audio track and the return track. Do you know what could cause this?
If you’re monitoring input, then of course no difference is shown whether the Amp is turned on or off. You’re monitoring the input after all. Just check where effects are in the signal flow. For them to show a difference, they’d have to be positioned before the input.
Thanks for your reply! That makes sense but I can hear the result of the amp being turned on and off in the monitored signal. I just don’t see it in the meter read out.
Well yeah, if you’re monitoring input, you won’t see it.
Ok gotcha so this was the cause of my confusion. When your “monitoring input” your not really monitoring input. Your just placing the track level meter directly after the input. What you hear will always come from a point after the device chain. This could be troublesome if you set your external gain by the level meter only to clip after recording. (Had me head scratching!) Now that I’m aware of this I’ll just send the signal to a return track and look at that level meter, which will reflect the post device chain signal (given you have that option selected in the master track). 🙂
If what you hear is not coming from the input when your monitoring input, what does “monitoring” mean?
From Live’s manual (chapter 14.1):
““Monitoring,“ in the context of Live, means passing a track’s input signal on to the track’s output.” So when you’re monitoring the input, you’re monitoring what’s set in Audio In, not any clips.
Then why would I hear the effects in the device chain? (when monitoring input)
Because as it says in the description it’s the input signal being passed through to the track’s output. In between is the device chain. You never hear it free from effects unless there’s no effects on the track or they’re turned off.
Ha ha are you messing with me now?? 🙂 You said:
“If you’re monitoring input, then of course no difference is shown whether the Amp is turned on or off. You’re monitoring the input after all. Just check where effects are in the signal flow. For them to show a difference, they’d have to be positioned before the input.”
The track level meter is after the device chain in the signal flow. So then why does it not represent the level after the device chain?