In electronic music these days, especially in techno and house, it’s very common to layer kicks. Personally, I hardly ever use this method and prefer getting the one bass drum I use to sound just right. Then again I don’t mix my songs with the kick up front and in your face. If I can’t find a decent sound for it, my favourite go to is to simply hit the mic that I’ve always hooked up. Try it, it works really well.
More isn’t always better
Layering kicks does have its merits, but can also have downsides, if not done right. Some producers layer a dozen sounds or so hoping to get the perfect sounding kick. They just forget one important thing. The more layers you have the more quiet everything will sound and the tougher it is to mix. And phasing between the kicks might occur, making your kick sound meek.
So if you want to use this method, do yourself a favour and limit the amount of different samples right from the start. Two generally suffice. One for the low end, the other for the mid and high frequencies to give it shape. Occasionally, you might need a third one to fill the mids.
Don’t forget the bass
Try to find one kick that sounds pretty good already with a well rounded low end. Now try it in combination with your bass line. Drums and bass are called the rhythm section for a reason. Both need to work well together. The relationship between the kick and the bass is especially crucial in all kinds of electronic music. So whatever you do with your kick, don’t forget to check back with the bass to listen how well they play together.
Pick & pitch
Now it’s time to choose a second kick that has a good amount of frequencies in the mid and high range. If you can’t find a well fitting one, try pitching one up a bit and see if the two kicks gel better. While you’re at it, you might want to consider tuning your kicks to be in the key of your track. The new Tuner audio effect in Live can help you with this.
EQ is your friend
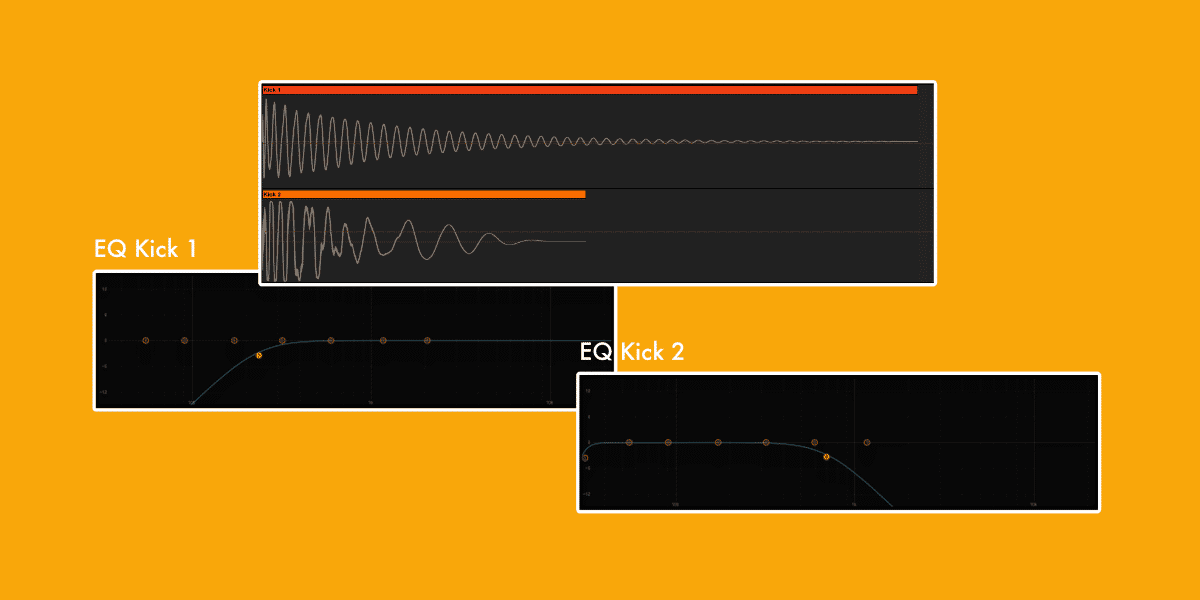
Odds are, that the second kick will also have some bottom end that will be competing with the first kick sound. After all, it’s supposed to be a kick. To remedy this, we can use an EQ – in Ableton Live the EQ Eight is best for this – to cut the frequency ranges that overlap on both samples.
The one with the great low end might need a cut in the mid and high range, the other one most certainly a cut in the low range. If you’re unsure, add the Spectrum (or a similar tool for frequency analysis in your DAW of choice) to your master track and keep checking back when playing both samples together. Look out for bumps or valleys in the frequency range and adjust the cut off until they’re gone.
A phase?
And then of course, there’s the possibility of phase cancellation. That happens when one of two samples is out of phase with the other, which leads to the sound to be more quiet or even canceled out completely. Two fat kicks don’t necessarily make an even fatter one.
In Live you can use the Utility effect on one of the kick samples’ chain and turn on both phase controls (Phz-L and Phz-R) and compare the sound of both samples together. If necessary, you can zoom in on both samples and move one so that the wave bumps and valleys match. Make sure you don’t skip the gain staging.
Once you’ve fine tuned the samples to form a perfect, powerful kick, it’s up to you, if you want to keep working with the samples directly in grouped audio tracks. Another option is to add the samples to a Drum Rack, so you can also use them for gigs, jams or other tracks. Don’t forget to add the EQs and transpose settings.
If you have any questions or would like to add something, please feel free to do so in the comments.


One Response
Nice one.