Edit: Updated. Valid for Live 8 to 11.
Before you can start having fun with your MIDI controller, it needs to be configured in Live – this goes for MIDI keyboards and all sorts of other controllers sending MIDI data. If you bought a MIDI controller that is supposed to be plug and play… well, you still need to set it up in Live. Plug and play only means that you don’t need to install any drivers for it. If you don’t have a MIDI controller, head over to the tutorial that explains a way to use the computer keyboard instead.
So here’s how to set it up:
- Check if there are any drivers available at the manufacturer’s website of your MIDI controller. If so, download and install them first. If it said plug and play on the packaging, you shouldn’t have to.
- Connect the controller to your computer. Most controllers use USB connections these days, so plug in the cable on both ends. Don’t connect it through an unpowered USB hub (this might really mess up the MIDI data stream), but either a self-powered hub or directly to the USB port of your computer. Some controllers need to be connected to a power source and turned on.
- Older controllers only use MIDI ports, some offer both options. If you want to send MIDI to and fro, make sure you connect MIDI input and output of your device to the MIDI output and input of either a MIDI interface or an audio interface with those connections available.
- Now open Live and go to the Live Preferences (Cmd + , on a Mac; Ctrl + , on Windows computers)
> MIDI/Sync (Live 8 and below)
> Link/MIDI (Live 9 and 10)
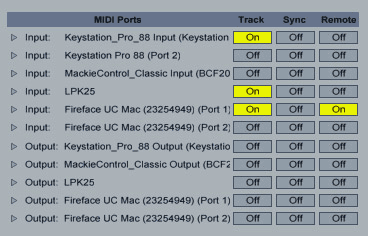
> Link/Tempo/MIDI (Live 11) - Control Surfaces are available for the most commonly used MIDI controllers. If this is the case for your controller (List of all MIDI controllers with available Control Surfaces), choose the Control Surface for it as well its Input and Output. This will enable instant mapping. If it’s a keyboard, also turn on Track for its Input under MIDI Ports. If Input and Output are shown in reddish, Live cannot detect the device (unplugged, off, broken driver).
- Some controllers require a preset dump. If so, the ‘Dump’ button becomes enabled. Make sure your controller is ready to receive the preset dump. If you’re unsure how, check its manual for instructions. Then press ‘Dump’.
- If there’s no Control Surface available for your controller, ignore the upper part in the MIDI/Sync tab. You’ll have to set it up under MIDI Ports instead. Don’t despair though, it’s not rocket science!
- To use your controller to play notes (i.e. keyboard, drum pads), enable the Track button for the device’s input.
- To use your controller to adjust device parameters, enable its input’s Remote button.
- In Live 11, if your controller offers MPE support, you can turn it on under MPE.
- If it sends visual or physical feedback, the Remote button of its output needs to be turned on as well.
- Controllers without a Control Surface for which you’ve enabled the Remote button, need manual mappings to be used.
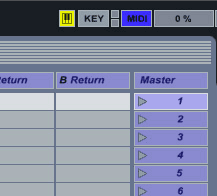
- Turn on MIDI mapping by clicking on the MIDI button in the upper right hand corner of Live or choose Cmd + M (Mac) or Ctrl + M (Windows).
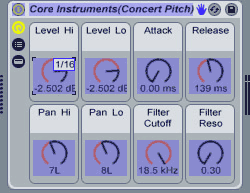
- Everything that’s mappable will now be displayed in blue.
- Click on the parameter you want to control, then move the knob/fader or hit the key/pad on your device you want to control it with.
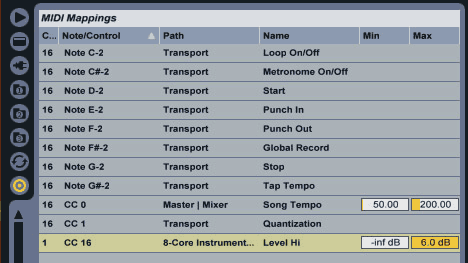
- Repeat the steps with whatever else you want to map. In the Browser (left) you will see the MIDI mappings you made. You can set the Min and Max for the parameter if available.
- Once finished, click on the MIDI button again.
Quick tip:
If there’s no Control Surface for your controller officially available, there’s still the chance there’s an user created one. Quite a few nifty users have written their own MIDI remote scripts (a.k.a. Control Surface) for various MIDI controllers. Do a Google search for: *name of the MIDI controller* MIDI remote script. This might save you a lot of time doing manual mappings. Of course, if you know Python or are willing to learn it, you could write your own scripts. The following blog is dedicated to this subject:
http://remotescripts.blogspot.com/
Happy MIDI controlling in Live! And of course, if you have feedback or questions, leave me a comment below.
There are plenty more Ableton Live tutorials where this one came from.





40 responses
Hello. Nick at Ableton sent me the link to your page. Very useful, and I located a midi script that shows up in Ableton for my controller. I am using a Behringer FCB 1010 and even with the midi script and an editor I can’t get the thing to work…much.
Switch 3 in bank 0 sends out a note message (c2) and that seems to work, but that’s just about it. The main, actually only reason that I purchased the fcb1010 is that as a guitarist I want to control the guitar efx with my feet… Switch 3 works but nothing else. I have tried it with Amplitube and other plug ins and it’s the same story. Any suggestions would be most welcome.
All the best,
Helio
Hi Helio, I personally haven’t used a FCB 1010 myself, but I heard it’s really tricky to set up. However, there’s a great tutorial on how to set up the Behringer FCB 1010 with Ableton Live. It includes a link to a Control Surface made by a user that will help you use the foot controller in exactly the way you want. 🙂
Live 9 offers a midimap option for scrolling thru scenes. Do you know of an option to scroll thru tracks/instruments?
Thanks
Scrolling through tracks and instruments is not as easy in Live as with scenes. Some MIDI controllers support this natively. If you don’t have one of them, there are workarounds to achieve this, but it’s a bit too long for a comment.
Hi Madeleine,
This is a great tutorial. However, after following the instructions I am still having the same problem I’ve been having after following every other MIDI hardware instruction list out there (there aren’t many). Here’s what I do:
1) Plug in my MPD26 via USB on Windows
2) Start Ableton Live 8 Lite
3) Open preferences:
(i) MPD26 is an unsupported control surface, so I don’t mess with the top
(ii) I turn on both Track and Output for the MPD26, and Output for Microsoft GS Wavetable Sync
4) I go to session view and drag “Backbeat Room” MIDI drumset from Impulse into the MIDI slot
5) “Backbeat Room” 2X4 grid of drum components now appears in the Device area (“Kick”, “Snare”, etc. each with their own decibal wheels).
6) I click on the MIDI button, click on “Kick,” and hit a pad on my MPD26
7) I can now see the map point in the mappings list. It says:
Channel: 1
Note/Control: Note D2
Path: 2-Backbeat Room | Backbeat Room
Name: Kick
…Min/Max dB…
8) I turn off the MIDI button, to try to play the sound. But when I play it, it plays the tone D2 instead of the drum sound.
For some extra info, the MIDI instrument inputs set to Channel 1 from the MPD26.
Also, on the screen of the MPD26 it says “NOTE” directly next to the channel indicator.
How do I get it to play the drum sounds instead of (what seems to be) the default tone for the pad?
Have you tried the Control Surface for the MPD24? The automatic mapping should work if you use the right preset on the MPD26. It’s either 1 or 5 and should say ‘Live’ where it before said ‘Note’.
The Impulse slots use the notes C3 to C4 (only white keys) and can’t be mapped. What you tried to map is the volume control of the Kick and that is best done to a knob or fader.
I am using an Alesis QX49 with Ableton Live Lite 8 and my keyboard does not seem to work. II plugged in my QX49 with the USB port and it automatically turned on. Then I open Ableton.
I have already copied the MIDI Remote Script to the propper file:
Users > Peter > AppData > Roaming > Ableton > Live 8.04 [or your version] > Preferences > User Remote Scripts
But once I go to Options, Preferences, MIDI sync, and select QX49 inthe Control Surface, nothing appears in Input (it onlya says NONE). And in Output, the only option is Microsoft GS Wavetable Synth.
And under that, on MIDI ports, it appears only one output option:
Output: QX49 Output (Microsoft GS wavetable…).
The Computer MIDI keyboard works just fine, but the Alesis QX49 keyboard does not work at all.
Please, help!
Live has recognised the script, but not really your keyboard (there should be an option for Input both in the Control Surface In as well as the MIDI ports).
First of all, you should really update your Live Lite 8 version as it’s outdated and might be (part of) the problem. Updates are free and can be downloaded from your Ableton user account. Please also update the firmware of the Alesis and then install the latest version of the remote script afresh in the updated Live Lite from: http://www.alesis.com/qx49. Hope this helps.
Hi,
ich habe ein Problem mit meinem Midi-Keyboard und Ableton Live 9.1.5.
Das Keyboard wird in der 32 bit Version nicht erkannt und erscheint Orange, in der 64 bit Version funktioniert es allerdings tadellos (Merkwürdig?). Ich habe bereits mit dem Programm usbdeview alle unnötigen USB-Treiber gelöscht und auch verschiedene im Geräte Manager gelöscht und neu geladen. Ableton habe ich auch schon mehrfach neu installiert. Ich benutze Windows 7 64 bit. Danke für Hilfe!
Du hast leider nicht erwähnt, welches Modell Du hast. Kann es sein, dass das MIDI Remote Script in der 64bit Version nicht vorhanden ist? Vielleicht einmal beim Hersteller nachfragen oder beim Ableton Tech Support, wenn das Problem nur mit Live auftritt, in anderen Programmen aber funktioniert.
Any luck using an AVID Control 24 desk with Live? I believe it uses Ethernet cable to plug in. Do you know if there is a user write script to make this work with Live 9?
Thanks!
I’m not sure, it’s possible. There definitely isn’t a script for it in Live 9 and I haven’t heard from any written by users. As far as I know, it’s a dedicated controller for Pro Tools only.
Hallo Madeleine,
danke für die vielen nützlichen Ableton-Tipps.
Ich bin ein Midi-Neuling und hätte gerne gewusst, ob sich ein Controller wie z.B. der Akai APC 40, den ich ins Auge gefasst habe, die Mappings merkt. Oder muss ein DJ vor jedem Live-Set sämtliche Effektknöpfe usw. für jeden Song wieder neu mappen?
Für die APC40 gibt’s eine Bedienoberfläche, d.h. die Mappings sind automatisch vorhanden, wenn diese in den Voreinstellungen unter MIDI/Sync eingestellt ist. Eine Liste aller Controller, für die es eine Bedienoberfläche gibt: https://www.ableton.com/en/articles/live-9-native-supported-control-surfaces/
Danke für die Antwort! Das hab ich gecheckt, das Ableton den APC erkennt. Mir ist aber nicht klar, jetzt allgemein gesprochen, wenn ich in einem Track mit mehreren Effekten z.B. den Controller-Knob1 z.B. dem LFO des Synthis zuordne und Knob 2 dem Dry/Wet-Regler des Reverbs usw., ob diese Zuordnungen bestehen bleiben?
D.h. wenn ich am nächsten Tag den Computer hochfahre, in Ableton den Track aufrufe, sind dann meine Zuordnungen wieder vorhanden oder gehen die verloren, wenn man die Arbeit in Ableton beendet un´d den Computer runterfährt?
‘Tschuldige die dummen Fragen eines Laien 🙂
Kommt drauf an, was Du mit “zuordnen” meinst. Wenn Du Parameter manuell auf die Drehknöpfe legst, dann werden sie jeweils mit dem Live Set gespeichert.
Very good write-up. I absolutely appreciate this site.
Keep it up!
Thanks for sharing your thoughts on ableton. Regards
Dear Madeleine,
I have a problem with connecting my Yamaha CBX-K3 midi keyboard and getting it to work in ableton live 9.
I connect the yamaha midi out with a Tascam US-144 and that is the DAW i use in ableton.
I tought it was just plug and play. it does not show up in the list of the midi devices and
i tried to download a driver but it asks for a com port and so on and still does not work
Do you have any idea if the Yamaha CBX-K3 can work in ableton? or is it just too old?
Thank you, in advance.
There’s only plug and play with newish MIDI controllers, mostly those connected via USB. Try the manual setup steps for your Tascam US-144 MIDI port that hopefully shows up under MIDI ports. If it doesn’t, download and install the driver.
Hello Madeleine,
I’m having some serious issues with midi (live input) lag.
I’m using Ableton live 9.2.1, 64 bit, on OSX yosemite.
Using M-Audio keystation Mini 32 at my desktop.
Komplete Audio 6 as audio interface.
There is a huge delay between pressing a key on the keyboard, and getting a sound from ableton.
I don’t think it’s an audio card / driver issue : If I use Logic X, or the standalone applications eg NI Battery 4, Pianoteq 5, there’s no delay.
Even with exactly the same buffer settings.
When having both Ableton and one of the other programs open, playing the keyboard will immediately generate audio from the other program, half a second later the audio from Ableton will sound.
Impossible to do any live input this way. (I currently have to default to pressing a chord on the keyboard, then position it on the piano roll …)
I don’t know if it’s related to Ableton live 9.2.1 only, since I started a new project, and made a different template for it.
Any idea where I should start looking for a solution ?
Many thx,
Joh
PS : I haven’t tested it yet with non-usb midi keyboards yet (my desktop is a bit to far from them at the moment), but that still wouldn’t explain the fact the other programs are doing just fine …
There are different reasons why this might happen and it’s impossible to say which one it is in your case. I’d suggest to contact Ableton’s tech support and send them a Status Report along with it. They should be able to quickly pinpoint to what the issue is by looking at the report.
OK, will do that.
I already to manage to link the problem to the template I made for the project.
Don’t know why, it does contain around 100 channels, but not too many plugins loaded, and the sampler plugins don’t have actual libraries running yet.
The strange thing is that it happens to all midi plugins, even the the VERY lightweight ones like Pianoteq 5, so it seems directly related to the Ableton’s (live input) Midi handling.
Shouldn’t be happening, especially since CPU usage only is about 15%.
I will let you know the outcome (if they have a solution).
Hope so, since all the project songs “backbones” have already been constructed with the specific template (including a lot of master tempo tracks …)
Anyhow, thx for the input.
Joh
Hallo Madeleine Bloom,
vielleicht können Sie mir helfen. Ich habe 3 Devices (APC 40 MK2; Livid DS-1 & Launchpad S).
In der Clip Matrix werden für jedes Gerät eine Umrandung angezeigt. Gibt es eine Möglichkeit, diese mit nur einem Gerät zu steuern? Quasi 1 Master Gerät der Rest ist Slave. Als Beispiel: APC 40 MK2: Ich drücke die Pfeiltaste, und die Umrandung von APC 40 MK2 und Launchpad gehen gleichzeitig nach unten.
Ich hoffe ich habe es Verständlich erklärt.
Ich danke Ihnen vielmals.
Liebe Grüße aus Mannheim
Alex
Sorry für die späte Antwort. Wenn ich das richtig verstehe, sollte die LaunchSync PRO Serie von Isotonik Studio zumindest für die APC und das Launchpad die Lösung sein. Bin mir nicht sicher, ob’s auch für den Livid Controller funktioniert. http://isotonikstudios.com/isotonik/launchsync-series/
estimada madeleine yo quiero saber como hago para configurar mi teclado del ordenador para que me funcionen todas las teclas osea para que yo pueda tocar notas musicales con casi todas las teclas de mi ordenador como lo hago gracias tengo el ableton 9
Sorry, my Spanish is terrible. I think you’re looking for this: https://sonicbloom.net/ableton-live-tutorial-computer-keyboard-as-midi-controller/. If you prefer a video: https://sonicbloom.net/ableton-live-tutorial-the-computer-keyboard-as-a-midi-controller-video-tutorial/
Excellent web site. Plenty of useful info here.
I am sending it to a few pals ans additionally sharing
in delicious. And certainly, thanks on your effort!
Hello Madeline!
My intention is to use ableton for live performance. Do you know if is possible to change tracks in avoiding pressed sustain pedal issues? I’m worried about the following issue (common in most DAW): if a note is pressed a and sustained it whie recording track 1, then the track 2 record button is pressed, the track 1 keeps sustained…. There is anyway to release the sustain for track 1 on release it in track 2? Needs script programming for automation?
Well, it’s possible to solve with Max for Live. This device by Dennis DeSantis doesn’t do exactly what you’re asking, but it gets rid of stuck notes.
Thanks for reply, Madeleine!!! With some MIDI automation worked like a charm!!!
How many years searching for this!!! Like me, many people are in youtube, and forums searching for “how to use Ableton with MIDI Controllers for Live performance”, but, unfortunately, information about how to setup Ableton (without Instrument Racks and chains, at least) and how to use Max for Live (needs better divulgation, in my opinion) for obtaining the desired results not widely spread …
Thanks a Lot!
Hi, I recently bought a Roland RD-800. I’ve got all the drivers set up and everything, but it an only outputting onto the keyboard itself. Is there any way of outputting my midi tracks to my laptop instead – for instance outputting to ‘masters’ like audio tracks do?
I’m not sure I understand what you want to do. Do you want to get the audio into your computer? If so, try using the External Instrument from Live’s Browser.
wait so it’s 2017 and ableton still didn’t implement absic SAVING/IMPORTING/EXPORTING of said midi mappings? if i creat some craze big midi mapping for my new controller, there is NO WAY to import that into a different project? only the 8 macro knobs can be saved?
please madeleine tell me you know a way around this.
There’s this web app called Remotify that offers an easy way to create your own MIDI remote scripts without any programming. I’ve written about it here.
Dear Madeleine, I’m completely new to Ableton and have the trial versioin (until I can get it to work). The trouble I’m having is that my computer recognizes and plays the Midi keyboard (keystation88) but Ableton does not receive input (no flashing light at the top right corner), but recognizes it in the Preferences – Midi window.. I have tried different settings, including setting it as Control and leaving Control as “none”. But still no luck.
I know this is a beginner question but would you be able to give an insight as to why it could be? Also, let me know if you need additional information.
In terms of MIDI setup, choose the Keystation Pro 88 under Control Surface, then the keyboard as Input and Output. Then under MIDI ports for the input of your Keystation make sure that Track is turned on and check if Live now recognises as input in the top right corner. If this doesn’t help, I’d recommend getting in touch with Ableton tech support, because it indicates a bigger issue.
IT WORKED!!! Thank you sooo much. 🙂
Srta Madeleine: estoy instalando mi sintetizador Yamaha modx7, y deseo usarlo como controlador , he estado poniendo la configuración en link midi de algunos tutoriales de youtube, aun no logro que cuando tecleo el sintetizzador se represente en el programa.
¿Debería sonar el controlador y representarse como barras(midids) en el programa?Gracias por su atención.