Automatic Tempo and Time Signature Changes in Arrangement View
In this tutorial we’re looking at how to create automatic tempo and time signature in Ableton Live’s Arrangement View.
In this tutorial we’re looking at how to create automatic tempo and time signature in Ableton Live’s Arrangement View.
Let’s say you want to play clips with different tempi and/or time signatures all in a Live Set in Session View. This can be useful for Live Performances as well as DJ-Sets. Scenes are great for starting a whole row
There’s a few hidden features for tracks that not many people are aware of. All of them can be very handy for keeping track (see what I did there?) of where’s what and help with the workflow.
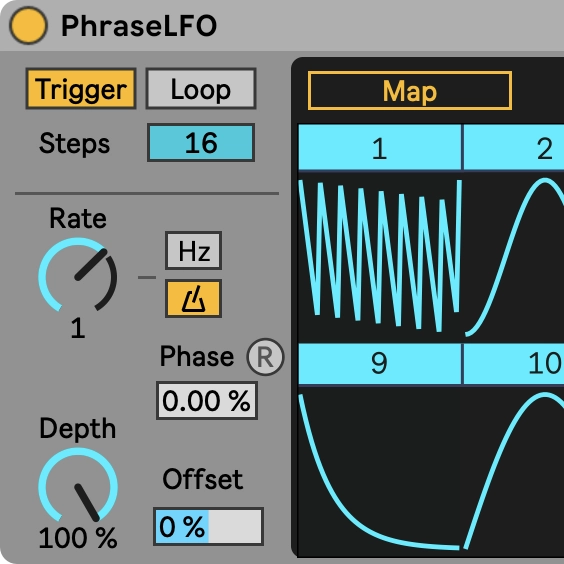
There are two kind of envelopes in Live, clip envelopes and automation envelopes. These can be added via MIDI controllers or drawing. Or a combination of both. To draw envelopes, you need to turn on the Draw Mode by either clicking
If you tend to use certain audio files as your favourite building blocks, you might want to store the clip’s settings. Especially if you adjusted the warp markers so the clip plays perfectly in sync.
The metronome sound in Ableton Live is pretty piercing and can easily bleed into your audio recordings. Especially when recording vocals. Have you ever wondered how you can change the sound to something more pleasing and less shrill? Here’s how:
Let’s say you like certain device presets a lot, but you need to tweak certain parameters to get the desired result. To save you valuable time, you can save your own presets.
Ableton Live can be both Rewire Master and Slave. However, Logic can only be Master. This tutorial will explain how to get Live rewired to Logic. So let’s cut right to the chase…
Ever seen the message that media files were missing? When you make music you want to be sure that none of your audio samples are missing. Ableton Live – just as other DAWs – only references those audio files. This
So you have recorded MIDI notes into clip, but now realise you want them or some either play longer or shorter.
If you want to use plug-ins in Live, they need to be set up first whether it’s VSTs or Audio Units (Mac only). It’s an easy and quick process when you know how. This tutorial will guide you step by
Sometimes you might want to temporarily mute particular clips or individual notes in a MIDI clip. To figure out what’s unnecessary, unwanted or to add variations or a break. However you don’t want to destroy anything you already have in