MIDI itself contains only data like note number, velocity and length, but no sound. To turn MIDI into sound you need a MIDI instrument. This tutorial shows you step by step how you can record MIDI.
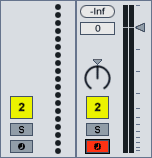
- Drag and drop a MIDI instrument, e.g. a Simpler Preset, from the Live Device Browser into a MIDI track. You will see see that it now has a Track Volume Slider just like audio tracks. This indicates that audio is now routed out of the track, not MIDI data anymore.
- Make sure the MIDI track is armed. By default arming is set to exclusive in Live’s Preferences > Record/Warp/Launch. Unless you’ve changed that, adding a MIDI instrument will automatically arm the track.
- If you have a MIDI controller like a keyboard or drum pads and it’s set up correctly, you can now play and should be able to hear the sound. If you can’t hear anything, check the audio setup. See the tutorial for Mac or Windows if you don’t know how.
- If you don’t have a MIDI controller, you can use the computer keyboard to play. Check out my tutorial if you don’t know how.
- Before recording you should set the Tempo and Time Signature. You can either enter the BPM directly or Tap out the tempo by hitting the Tap Tempo button for each beat. Click on the Time Signature to change it.
- To record in sync with the tempo, turn on the Metronome.
- You can also set a count-in to have some time to get ready before the recording starts. For this open the Preferences > Record/Warp/Launch and choose 1, 2 or 4 Bars for the Count-In.
- You can either record into Session or Arrangement View. The former is good for jamming and trying out ideas in loops, the latter for continuous recordings.
- To record into Arrangement View, you need to click on the Global Record button, then hit Play.
- If you want to record into Session View, you only need to click on the Record button in a Clip Slot to start recording.
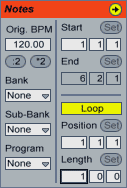
- It’s also possible to create a MIDI clip with a fixed length to record into. For this double-click on a Clip Slot which creates a MIDI Clip of 1 bar length. You can change the length of the Clip by adding the desired length in the Loop Length field.
- To record into an existing MIDI Clip or to add notes on top, the Overdub (OVR) needs to be on.
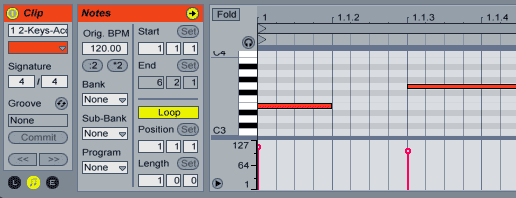
- Hit the Spacebar again to stop recording. The Clip View at the bottom of Live includes the MIDI Note Editor that now contains the notes you’ve recorded. To see the Clip View of a MIDI clip, it needs to be selected. If it’s not, double-click the Clip to make it visible.
Do you have any questions or suggestions for this tutorial? You’re welcome to leave a comment.
There are plenty more Ableton Live tutorials where this one came from.







12 responses
How can I make the clip extend as I play, in non loop mode?
If you don’t want to create a loop, it’s best to record in Arrangement View. Then you need to make sure that the track is armed and press Global Record to record however long you want.
Hallo!
Ich habe eine Spur mit dem Midi-Controller aufgenommen. Die Noten, die ich gespielt habe, wurde korrekt aufgenommen, jedoch sind die Parameter, die ich beim Aufnehmen verändert habe (LFO, Lautstärke, Delay on/off) nicht mehr da. Was habe ich falsch gemacht?
MfG
“Automation Arm” oben in der Bedienleiste vielleicht nicht angehabt? Es gibt verschiedene Gründe, warum das passiert sein kann…
I want to play with my MIDI (ctrl49) into Ableton. And when I record I can see the notes that I have played and recorded. But I can not hear anything without adding an instrument to it. How can I record and hear the recording without using the instrument? That is because I have already made out the sound that I like from my MIDI and just want to record my sound.
MIDI is only data. So without adding an instrument that translates the data into sound, it’s silent. Why don’t you add the MIDI instrument that you made so that you can hear how it sounds while you play and record?
I am a Jazz saxophonist and pianist. I cannot figure out how to make a simple, Jazz standard song in Abelton – like A-A-B-A, 8 bars each section. The recording is continuous! I need to record one of these sections and a time, then put them together. Any help would be appreciated! I’ve looked at many sources and found no answer!
Since there are two views in Ableton Live, there are two ways to achieve this. You can either record each section in the Session view, one section per scene and then record the end result into Live’s Arrangement View. Or you can use the Loop braces in the Arrangement View along with punch-in and -out functions (explained in chapter 16.3.1 of the Live 10 manual. The features haven’t changed since Live 9 either). Since you’re a Jazz musician you will most likely prefer the linear approach in the Arrangement View.
You are great!! Thanks for using your patience with us. #coming from logic to Ableton-tho it is 4 times the price, I see the session view value VERY HIGHLY—as well as the German engineering. I just started with the Lite version this week and I love it. #moc feel sequencer in Ableton. Can’t grab the Suite yet but I sure will///any affordable routes to inform me of, please feel free. Thanks for everything Sonic
Watch out for sales on the Ableton website. You missed the summer sale, but there should be one before Christmas.
I am using Alesis Nitro Mesh kit to record midi in Ableton. I can hear myself perfectly, even when recording. However after I hit stop recording, only a few notes appear, and they’re really skinny and short, unlike the normal midi blocks with a piano. No idea whats’ going on. Any suggestions?
Since you’re using a drum kit and sticks, the recorded MIDI notes are expected to be shorter. I’m not sure why only some notes are recorded though. The only thing I can think of right now is that since MIDI is sent in a data stream with one message after the next, perhaps you’re getting a “traffic jam”? Try connecting the Nitro directly to your computer, not via a hub. Otherwise I’d recommend getting in touch with Alesis and perhaps also Ableton tech support.