LiveControl 2 just came out. It’s a Lemur template for the iPad and it’s free for all owners of Lemur. It’s very easy to set up and offers full integration with Ableton Live. If you’re looking for video tutorials for LiveControl 2, they’re this way.
Have a look at LiveControl 2:
For me, it arrived at the perfect time, because I was just building my own Lemur template for my upgraded live performance setup. I love how easy it is to use because of its Control Surface for Live. However, for my live setup I need a couple of pages of my custom controls for live looping and so on. So I tried if I could simply add them to LiveControl 2 and spare me a lot of time and trouble. Great news! It’s hackable because it is just a template for Lemur. Most of LiveControl 2 is programmed, not object based as typical for Lemur, and is therefore hard to unravel. The following tutorial doesn’t cover how to hack the existing interfaces (or layouts), but how to add your own.
Customising the LiveControl 2 Template
- Open the LiveControl_2_0.jzml file in the Lemur Editor.
- Choose Ctrl + Shift + S (Win) or Cmd + Shift + S (Mac) to save the template under a new name.
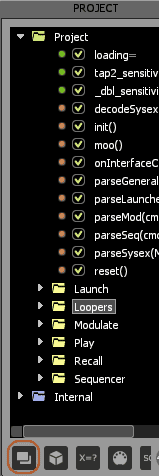
- In the Project window click on Create Interface or use Ctrl + Shift + I (Win) or Cmd + Shift + I (Mac).
- Name your new interface in the pop-up window and press OK (Btw, adding numerics in front of the name makes it possible to change the order of the interfaces).
- Now you can add any buttons, pads, knobs or faders that you need.
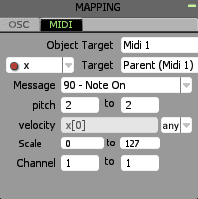
- In the Mapping window of the selected object under Object Target, change it from ‘Parent (MIDI 0)’ to ‘MIDI 1′(anything, but 0). Under Target choose ‘Parent (Midi 1)’.
- Then choose the desired MIDI message, pitch, scale and channel.
- You can add additional interfaces. If you already have your own template and want to reuse complete interfaces or parts from it, you can save them as modules. For this, select what you want and press Ctrl + E (Win) or Cmd + E (Mac). You can then import them with Ctrl + I (Win) or Cmd + I (Mac).
- Once you’re done, don’t forget to save.
- Click on the Play button to start the Lemur connection (or Alt + C), choose the iPad and click on Connect. Now the template is synced to the Lemur.
- Save it by pressing the cog wheel in the top right corner and choosing Save project…
LiveControl 2 uses the Lemur Daemon Input and Output 0. The added objects will have to be MIDI mapped unless you know how to add them to the Python scripts (Control Surface). To make sure, the automatic and manual mappings don’t interfere with each other, we’ll use a different input and output.
You can of course go much further by adding your own scripting. It’s also possible to set up OSC Mapping instead of MIDI, e.g. if you want to control another application.
Now for the setup…
- On the iPad, make sure MIDI 1 (or whatever MIDI port you chose) is set as well (under Settings > More settings…).
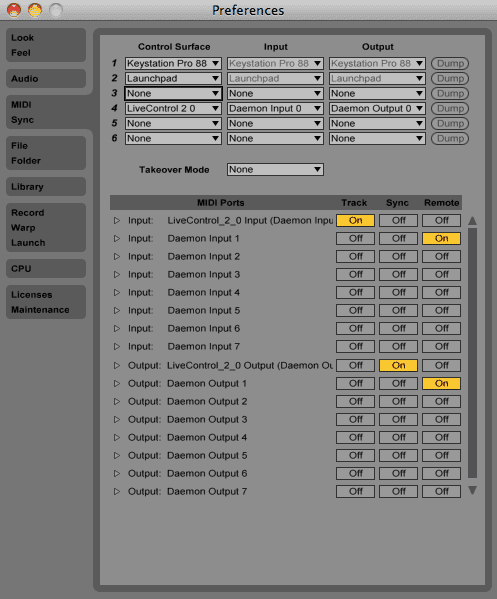
- Now start Live, open the Preferences with Ctrl + , (Win) or Cmd + , (Mac) and the MIDI/Sync tab. Make the settings as described in the Setup Guide for LiveControl 2.
- Additionally, turn on Remote for both Daemon Input 1 and Daemon Output 1. If you also want to use your own objects to play sounds, Track needs to be on for Daemon Input 1 as well.
- Open the Live Set you want to use for your live performance, enter the MIDI Mapping mode with Ctrl + M (Win) or Cmd + M (Mac) and map your custom Lemur objects as desired.
- Once done, quit the MIDI Mapping mode and save your Live Set.
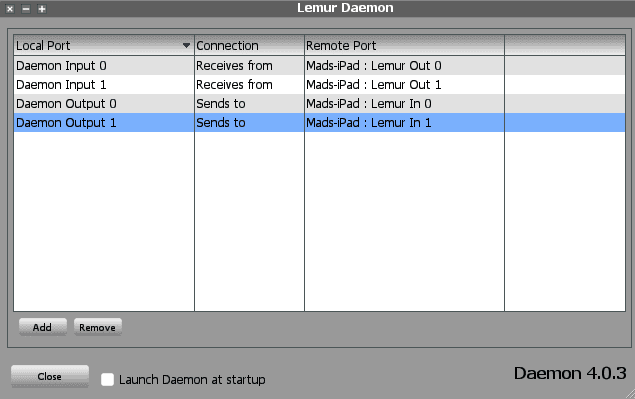
The Lemur Daemon Setup should now look like this:
The settings should look roughly like this:
Have fun!
Let me know if you have any questions, suggestions or other comments.











10 responses
Hey Madeleine
Nice one on the heads up. Just wondering if there’s a chance that you may be doing a video tutorial on how to use this great template?
Will
Looks like no one has done one so far. Indeed it sounds like an idea to do a tutorial. Thanks for the tip. 🙂
Ive managed to get it all working apart from the modulation page.
very impressed with the play and sequencer pages.
look forward to your tutorial:)
Hoping to get them done soon. The heatwave here is killing my productivity.
Make sure u mail me when u do.
U rock!
Mrchamberspaul@hotmail.com
thank you so much for clearing the nooks and crannies up! Much better workflow and dependability
It’s really a nice and helpful piece of information.
I am satisfied that you simply shared this useful info with us.
Please keep us up to date like this. Thanks for sharing.
I Madeleine!
I really enjoy all your videos and tips, they are SO useful and different from others tutorials. I have not try this one yet but, just to emphasis the requests, it would be great that you make a video tutorial for that topic. Just sayin’
Cheers and thank you so much!
Martine
Thank you, Martine. The video tutorials for LiveControl 2 are already online and I’ve added a link at the beginning of this post.
Hi!
Sorry, I misunderstand … I already watched those videos, I thought it was about making a video on how to hack Livecontrol.
Anyway, anyhow …. thanks again for all you great tutorials and please, keep them coming …
Cheers,
m