In Ableton Live you have Session and Arrangement View from which you can export audio. This can be quite confusing at first and if you don’t understand how it’s done you might end up with rendered silence or too short audio files. So here’s the gist of it.
Exporting from Arrangement View:
- Most often you want to export the whole song you’ve created or its individual tracks. To do this, you need to have it recorded into Arrangement View first. If you don’t know how, here’s the tutorial for it.
- Drag the Loop Start and Loop End so the Loop covers the whole length of the song including all effect tails (reverb, delay) to be exported. Make sure the Loop is selected.
- Make sure that no tracks are muted that you want to include and no tracks are soloed, because what you hear is what will be exported. You can listen to the song once more to ensure it’s all good.

- Choose ‘Export Audio/Video’ from the File Menu or use the shortcut SHIFT + Ctrl + R (Windows) or SHIFT + Cmd + R (Mac). This will open the Export dialog.
- Choose your preferred rendering options (details below), then click OK.
- You can now choose the location to which the audio file(s) will be saved. Click Save and the rendering process will start.
Exporting from Session View:
- When exporting Session View clips, only clips with activated clip launch buttons are rendered. So make sure that all clips you want to export are launched first.

- Choose ‘Export Audio/Video’ from the File Menu or use the shortcut SHIFT + Ctrl + R (Windows) or SHIFT + Cmd + R (Mac). This will open the Export dialog.
- When exporting from Session View you need to enter the desired Length in bars, beats and 16th.
- Choose your preferred rendering options (details below), then click OK.
- You can now choose the location to which the audio file(s) will be saved. Click Save and the rendering process will start.
Audio Rendering Options:
- ‘Rendered Track’ options:
- If you want to export the mixdown of the song, choose Master.
- ‘All Tracks’ will render all individual tracks to separate audio files. That includes all MIDI and audio tracks as well as return tracks.
- Or you can choose a specific individual track. You can easily find the one you want since the track numbers and names are listed.
- All options will render the post-fader signals including insert effects.
- Turn on Normalize if you want the file to be rendered with maximum volume.
- ‘Render as Loop’ lets you render the file as a loop including any effect tails.
- You have the choice between Wav (Windows format) and Aiff (Mac format) under ‘File Type’.
- ‘Convert to Mono’ will render the file in mono. Live handles everything in stereo. This option is useful if you want mono files to be used in a different audio software or want to include mono files in your Live Set to keep it small.
- ‘Sample Rate’: To burn it to an audio CD, choose 44100. For mastering choose the ‘Sample Rate’ you had used throughout your production or the mastering studio asked for.
- ‘Bit Depth’: To burn it to an audio CD, choose 16. For mastering choose the ‘Bit Depth’ you had used in your Live Set or the mastering studio asked for.
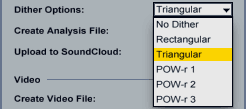
- Dither: Dithering introduces small noise, but helps avoid artifacts when reducing the bit depth. Live handles audio internally in 32-bit. Dithering should only be done at the end when you won’t export the file again. This is generally after mastering the track or when you want to burn it on CD. If you choose to not export in 32-bit and want to keep working with the audio file, Triangular is the safest mode. Rectangular adds less noise, but can add artifacts once the audio file is processed further. The 3 POW-r options introduce even less noise pushed above the audible range. These should never be used when processing audio further.
- ‘Create Analysis File’: Turn it on if you want to import the rendered file back into a Live Set.
Do you have any questions or comments? Let me know.
There are plenty more Ableton Live tutorials where this one came from.


31 responses
Klasse Seite.. den ganzen Nachmittag gelernt !! ^^Grüße Martin
Madeleine, ein toller Artikel. Wie gehst Du vor, wenn ein Song konvertiert werden soll. Nimmst Du Dir einfach ein kostenloses Tool oder etwas professionelles wie den Sonnox Frauenhofer Pro Codec, der richtig Geld kostet. In der Regel verflacht der Sound dermaßen, dass er für Onlineportale nicht wirklich attraktiv ist. Freue mich über Deine Antwort. LG Alvaro
Üblicherweise lade ich alles als wav oder aif in 44.1 kHz/16 bit hoch. Wird meist so gefordert. Wenn’s MP3 oder so sein soll, nehme ich entweder iTunes oder Wavelab zum Konvertieren. Das sind dann aber immer nur Vorab-Versionen.
hallo madeleine!
erstmal danke für deinen reichlichen ableton-in/output auf deinen seiten – hat mir sehr viel gebrachh!!
meine frage:
wie ist das optimale vorgehen wenn ich einen kurzen loop (1, 2, 4 bars) speichern will?
hintergrund:
beim produzieren kommt es bei mir sehr oft vor, dass ich synth- hat- drumloops erstelle die nicht in den momentanen song passen . statt diese zu löschen würde ich die aber sehr gerne behalten und evtl in späteren projekten weiterverwenden.
muss ich im grunde genauso wie du beschrieben hast vorgehen? also bei gerenderte spur, die spur auswählen die ich als loop haben will?
oder gibt es eine “elegantere” und schnellere lösung für mein “problem” ??
danke!!
ps: nutze (leider) immer noch live 8
Du kannst sie entweder rendern oder als Live Clips speichern. Dabei werden alle Einstellungen, die Du in der Clip-Ansicht gemacht hast, mit dem Clip gesichert. Ziehe den Clip in einen der Datei-Browser in einen Ordner Deiner Wahl. Am besten erstellst Du einen Ordner, in dem Du alle Deine Clips sammeln kannst. Du kannst den Clip (um)benennen und er wird dann mit der Endung .alc angezeigt.
Hi, how do I know the bit depth and sample rate of my production? before exporting the file.
Thanks
Sample rate is set in the Preferences > Audio or the driver app. Bit depth in the Preferences > Record/Warp/Launch. The sample rate and bit depth of each clip can be found in its sample box, right underneath the name.
Thanks. I’m a hobbyists and your guides are super helpful.
Hallo und bereits Danke!
Ich habe im letzten Jahr eine Menge Tracks mit Ableton erstellt. Pro Track habe ich immer ein neues Set gespeichert. Nun möchte ich alle Tracks für einen Live-Auftritt nutzen. Ist somit der einzige Weg das Exportieren von allen Clips und ein Importieren in ein neues “leeres” Liveset?
Zweitens würde es mich interessieren, ob ich bereits von Beginn weg sämtliche Tracks imselben Liveset hätte erstellen können und ob es Tricks gibt um Spuren zu sparen (zusammenfassen etc.)
Liebe Grüsse
Matt
Während man bei der Produktion ein Live Projekt und Set pro Track benutzt, ist die Idee, ein Live Set pro Live Set zu verwenden. Exportieren und Importieren muss meist nicht sein, außer man will MIDI-Clips, die nur abgespielt werden sollen, als Audio exportieren. Ansonsten kann man Live Sets kombinieren. Das Tutorial dazu gibt’s hier: https://sonicbloom.net/ableton-live-tutorial-merging-live-sets/
Hi ich hab ein Problem und zwar hab ich ein Set aufgenommen beim auflegen und will es nun in ableton bearbeiten…dies klappt auch aber als ich es exportieren will macht ableton dies nicht weil der zu renderne Bereich zu groß ist…was tun?
Versuch mal, kleinere Teile davon zu exportieren. Das sollte gehen. Dann wieder die Teile in Live importieren und nahtlos aneinander reihen und nochmals als ganzes Set exportieren. Mehr zum Grund hier: https://www.ableton.com/en/articles/2-gb-recording-limit/
Hallo Madeleine,
eine Frage zum Rendern.
Wenn ich beim Rendern auf alle Spuren gehe,wie verhält sich live mit den Effekten auf den Bussen?
Soll z.B. vor dem Rendern jeder Comp. ausgeschaltet werden,oder rendert live nur die Spuren ohne Rücksicht auf das interne Routing und die darin enthaltenen Effekte?
Vielen Dank,für die Beantwortung
Das Rendern der einzelnen Spuren passiert nach der Lautstärke in der Spur, d.h. alle aktiven Insert-Effekte darauf, Panning und Lautstärkeregelung werden mit einberechnet. Wenn Du das nicht mit drin haben willst, deaktiviere die Effekte etc, bevor Du renderst.
Gilt das den nun auch für die Busse?
Also wenn ich ein Drum-Bus mit comp.,Eq und Limiter habe, werden diese 3 Effekte mit eingerechnet,wenn ich beim Rendern auf alle Spuren gehe?Sorry,hab deine Antwort auf die Busse hin nicht verstanden.Vielen Dank
Ich nehme an, Du meinst Gruppenspuren. Die Effekte darauf werden nicht mit gerendert, da das Rendern ja direkt nach der Lautstärke in der Spur abgegriffen wird, d.h. bevor es zum Routing kommt. Die müsstest Du dann jeweils auf die einzelnen Spuren packen, damit sie mit gerendert werden.
Hi, ich habe eine Frage was das Rendering angeht.
Im Set klingt mein mix und alle spuren total klasse, jedoch nach dem rendern klingen meine tracks immer total verfärbt, die Bässe klingen hohl und stumpf und die mitten fressen sich irgendwie selber auf. Liegt nicht am EQ vom mediaplayer , klingt auch auf anderen medien darstellern so.
Mach ich iwas falsch beim rendern? habe mich an die gängigen tipps hier gehalten.
Liegts an meiner soundkarte? Laptop vaio. jedoch mir unbegreiflich klingt doch im set astrein….
Ohne weitere Infos ist es unmöglich zu sagen, wo genau das Problem liegt. Wäre eventuell ein guter Fall für eine Unterrichtsstunde…
HI, here is my problem:
I am using Ableton 9 with Kronos X and a Komplet 6.
Korg USB connected to PC
Korg Mono output Audio to Komplet 3 & 4.
Komplet USB connected to PC
Komplet Main audio 1 & 2 Out to Amplifier/Speakers.
Komplet MIDI OUT to Korg
Komplet MIDI IN to Korg
ASIO4ALL Driver
1) Playing notes from the Korg, I can record them on Ableton ; however, when
playing them back from Ableton, the sound doesn’t correspond to the
ones from the Korg. It is always the sound (instruments) located on Ableton.
– HOW TO make Ableton record my Korg’s sounds (original instruments) ?
2) Importing a MIDI file. I can see the notes, but when playing them back,
the sound doesn’t match the one from the original MIDI played with any
Audio Player.
– HOW TO make Ableton reciprocate MIDI file original sound?
3) Importing a WAV file into Ableton. I can transfer the WAV into a MIDI. I
can see the notes on the Roll, but there is no sound when playing them.
(only sound possibility is to drag Ableton Instrument into the Channel)
– HOW TO make Ableton play a sound from a WAV that has been changed to a MIDI?
Thank you all.
MIDI is just data and doesn’t make any sound of its own. To answer your questions it’d take quite a bit of time as you seem to be missing fundamental knowledge on how to deal with MIDI. Maybe a lesson with me about this would be helpful for you?
Frequently, clips I’ve exported and then imported back into Live have lengths don’t match the original clip by a very slight amount. Do you know why Ableton Live would alter the lengths of clips upon exporting them? I notice it’s happening by the clip’s “Sample” window, which shows an orange/red number for the “End” duration’s last digit.
My ableton wont export the audio all of a sudden. I have had loads of problems with Live Lite and this exact set worked fine a week ago with the same settings. The file is recorded, I can hear it playing but when I export it Google and Windows media player think it is a non .wav file even though it is and VLC plays silence. Total silence, not like the recording has recorded silence but like there is no recording. This is the set up, what is wrong? Its about 10 mb.
Everything is set to output master, there is only one audio track, ASIO is selected, file type is .wav, sample rate is 44100, bit depth is 16.
Are you exporting from Session or Arrangement View? It sounds like you might be exporting audio from the former, but with no clips playing. It’s most likely your export settings.
When i export my project the audio tracks does not appear on the mp3 only the midi tracks. Am I miss something? Thanks
Mmh, that’s weird. Make sure you haven’t muted or soloed tracks. Could it be that Live can’t find the audio files, because you forgot to “Collect all & save”?
how do I export the audio with the click???
You can’t export the click from Live. You need to set up a MIDI track with a simple click yourself.
Hello,
I can’t find out why when I want to export audio, it seems that everything is going well but an error appears, if it is to mp3 it says that it is a decode error and if it is wav it says that it cannot be opened.
I already tried in several ways, changing the export characteristics but I can’t find the solution.
Su consultoria es muy interesante y agradeceria su ayuda.
I’d recommend getting in touch with Ableton tech support. It seems like something might be wrong with your setup to do with your OS.
Woran kann das liegen das nur 100mb exportiert werden obwohl zum z.b. 1.1.1 – 287.1.1 eingestelt die länge der Spur ist. (länge des Tracks ca.7,30min.) und zum Schluss beschränkt er mir das auf 100mb und 6,36min….
-Master
-No Dither
-LOOP on
und bringt nur 100mb zum exportieren…
Gibt es in Ableton eine MB beschränkung die man einstellen kann ?
Ableton Live 11
Keine Ahnung mit den spärrlichen Infos. Schreib mich doch über Contact an.