Although there is not just one way to use Live and misusing software can be quite creative, there are best practices of when to use Session View and when to use Arrangement View. I thought I’d explain this here since a lot of users are confused as what to use when and how both Views are connected. This tutorial will be helpful when you’re new to Live or might clarify some things you were unsure about.
Session View
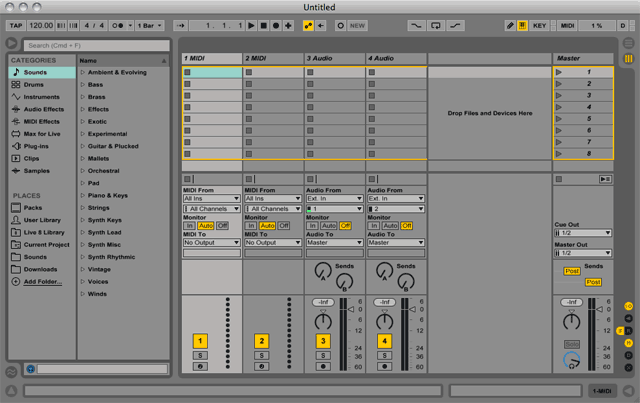
Session View, as the name already suggests, is intended to be used for:
- jamming and coming up with ideas
- playing live
- Djing
- in theatre, or
- whenever the length of a certain part is not known in advance or needs to react to other players
In Session View the tracks are aligned vertically from left to right. Each track contains Clip Slots from which clips can be launched. All clips in a row can be launched together as a Scene in the Master Track. So the clips in each row should contain the individual parts of a song or track that should play together. So all clips within a Scene could compose a whole song or a song could be split into different Scenes for verse, chorus and so on.
Arrangement View
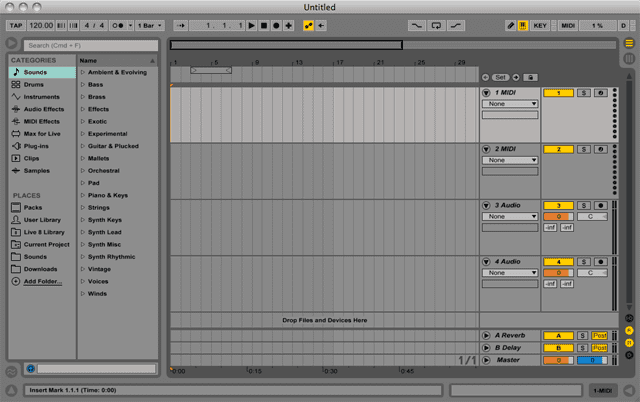
Arrangement View is mainly useful for arranging and producing, be it an original work or creating a remix. Anything along a fixed timeline with a set beginning and end.
Here the tracks are aligned horizontally from top to bottom, moving along a timeline from left starting at bar 1 at 0 seconds to however long your song or track is. This view will be familiar to anyone who has used a sequencing software before.
Session View and Arrangement View are not separated from each other. Not only can you toggle between the two views with the computer’s Tab key, but they are linked together by tracks. If you create, say, 8 tracks in Session View, then toggle to Arrangement View, you’ll see those 8 tracks there, too. If you add a MIDI instrument to a MIDI track in Session View, it will also be there on the same track in Arrangement View. Or if you add an effect to a track in Arrangement View, it will appear on the track in Session View as well.
This means they interact with each other as well. Especially when you’re not using one view exclusively, there is one important rule to remember:
A track can only play one clip at a time.
In Arrangement View this is pretty obvious as it moves along a timeline. So one clip will be played followed by the next one and so forth. But this also goes for Session View. If you’ve launched a clip on a track in Session View and then launch the next one down, the first will stop playing when the next one starts.
Now what if you want to use a combination of both views?
Session View vs. Arrangement View and the ‘Back to Arrangement’ button
Session View Clips have right of way. So let’s say, you’re playing the song in Arrangement View and launch a clip in Session View. On this track, the newly launched clip will play, even though the other tracks will continue playing in Arrangement View. This will be indicated by the clips being greyed out on the track in Arrangement View.
Even if you stop this particular clip in Session View, the track in Arrangement View will not be playing its clips. For this you will need to click on the ‘Back to Arrangement’ button that lights up whenever one or more clips in Session View are playing. Pressing it will make Live resume playback in Arrangement View and thus stop all clips in Session View.
New in Live 9 are the individual ‘Play’ buttons that appear directly under the ‘Back to Arrangement’ for each track in Arrangement View whenever a clip is playing in Session View. Clicking one will only stop the Session View clip in this track and make playback in the Arrangement View possible. This is useful if you only want to have selected tracks play the arrangement.
If you’ve created a new song or track in Session View and are now ready to put on some finishing touches before exporting the audio, you might want to head over to my tutorial on how to record from Session View to Arrangement View if you’re unsure how to do it.
Well, that’s it. Do you have any questions or something to add? Go ahead and leave me a comment.
There are plenty more Ableton Live tutorials where this one came from.







4 responses
If you are going for best contents like me, just go to see this web site every day for the reason that it provides quality contents, thanks|
Hi, ich hab eine Frage.
Wie kann man diese Gelbe aussenlinie in der sessionview machen?
Danke im vorraus,
MfG
Johann
Das ist die Umrandung einer Bedienoberfläche und gibt es nur für MIDI-Controller, für die eine existiert, und gibt an, welcher Bereich in Live gerade kontrolliert werden kann. Die Farben variieren, je nachdem, bei welcher Bedienoberfläche (1-6) in den Voreinstellungen unter MIDI/Sync Dein Controller einrichtet ist.
Your link “how to record from session view to arrangement view is broken” I would like to visit it. can you send me a note when it is fixed. Thanks ND