So you’ve found a great Max for Live device that does what you want, but one or more parameters can’t be automated or mapped. This is fairly often the case and I keep getting emails about this, so I’m going to show you how you might be able to remedy this quickly yourself. As long as these parameters are set up as live objects* in Max, you can easily fix this without any programming knowledge in just a few steps.
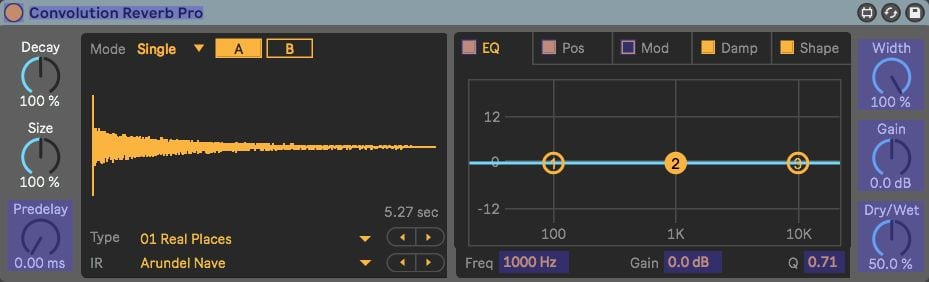
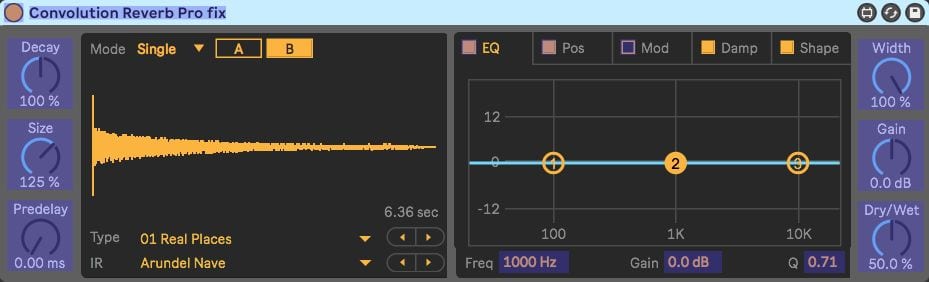
I’m going to show you step by step how it’s done with the example of the Convolution Reverb Pro that is available for free from Ableton.
- In the Max for Live device press the Edit button (third from the right in the title bar). This will open the Max editor and show the device in Live with a white overlay indicating that it is inactive in Live.
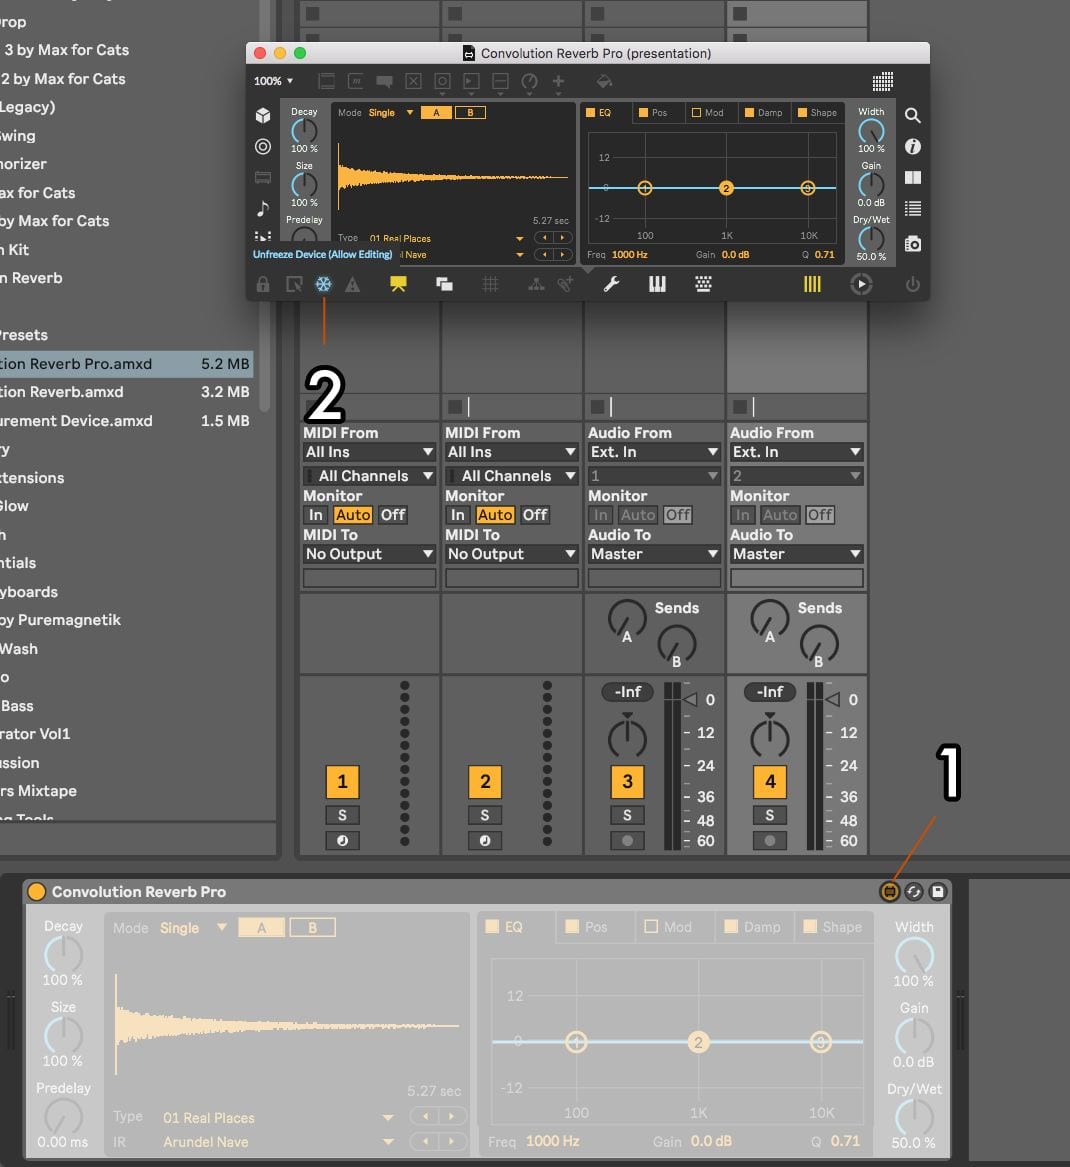
- Now click on the snowflake icon in the Max window in the lower left if it’s blueish. This will unfreeze the device and thus allow editing it.
- In the Max menu go to File and click on “Save as” (or Cmd + Shift +S on Mac, Ctrl + Shift + S on Windows) to save the device under a different name.
- Select the parameter you want to change with a mouse click (e.g. the Decay) and then on the right click on the i (Inspector).
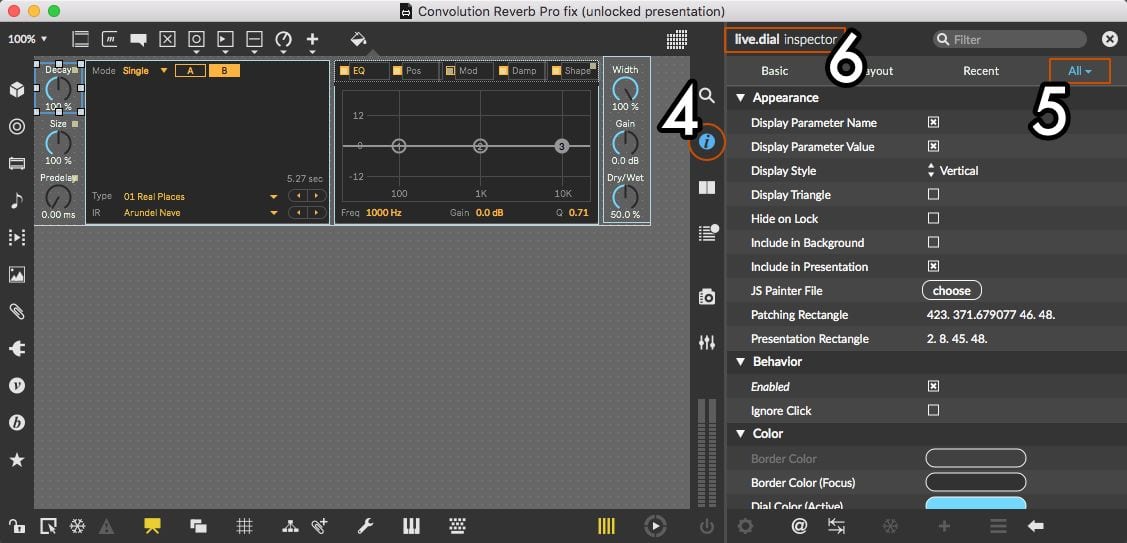
- Make sure “All” is selected in the top right of the Inspector panel.
- Check in the top left of the Inspector panel what kind of object it is. It should be one of the live.objects*. You can enlarge the Max window by clicking and dragging the sides or corners.
- If the “Parameter” options aren’t visible yet, click on the little triangle next to it to unfold them.
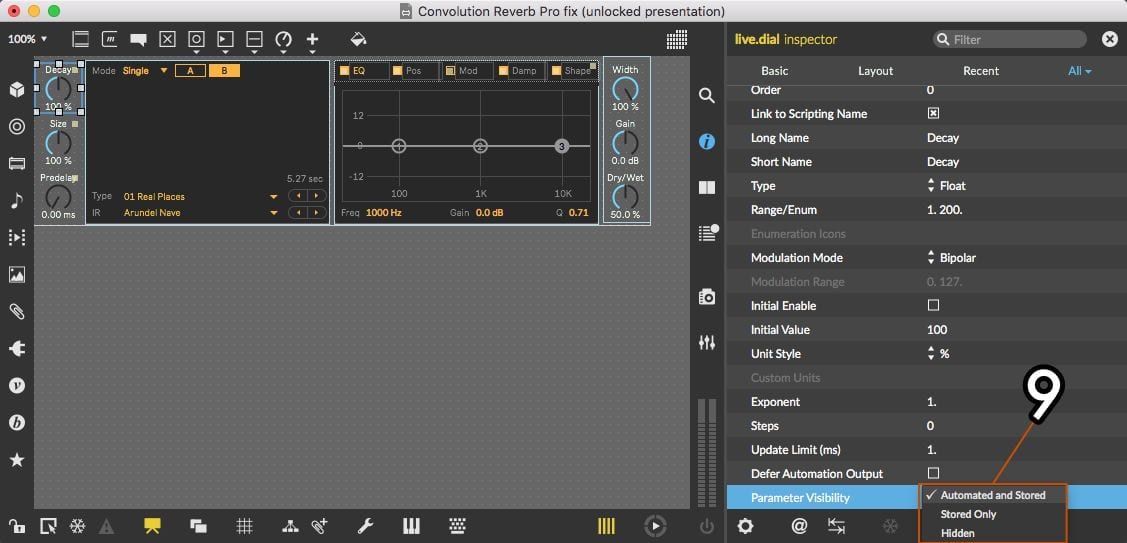
- Scroll down to “Modulation Mode” and choose something other than None (more info under Parameter Modulation).

- Scroll all the way down and select “Automated and Stored” for “Parameter Visibility”.
- Repeat steps 4 to 9 for further parameters if applicable.
- Now click on the snowflake again to freeze the device.
- Save the device with Cmd + S (Mac) or Ctrl + S (Windows) and close the Max window or press the Edit button in the device in Live again to leave the edit mode and make the Max for Live device usable in the Live Set.

*This doesn’t works with all live objects, but most. It works as described above for live.dial, live.box, live.gain~ and live.slider objects. It also works with live.button and live.tab objects, but you can skip step 8, since they don’t have an entry for “Modulation Mode”.
Let me know if you have any questions or comments.
This way for heaps more Max for Live devices & tips.


22 responses
So helpful… I was just trying to map Decay the other day and realized I could not do that…. now I can! Many Thanks.
Great! Very nicely explained too.
For more obscure devices that have virtually nothing mapped you can create a live.banks object which will allow you to add parameters and organize as well as rename banks. You can also rename your parameters by changing the long name, just make sure to check “link to scripting name” first.
Thanks you Madeleine and Christopher , I have made my first transformation of the max device NRPN Gen 2 to control my KORG EMX1 from the push with visual encoder and they works great . I am a beginner and now I find the way to make some Max device to control my favorite plugin from the push , if you have some step by step to do that inside Ableton with max they will great. Thank’s again
Hello,
I am trying to map the knobs from a M4L Volca Drum Editor to the Push 2 with this method but but does not seem to work. I tried with some of the Live.dial knobs changing parameter to absolute (only one visible other than none) and parameter visibility to automated and stored
https://github.com/mugenkidou/volca_drum/blob/master/volca_drum_editor_v0.4.amxd
This method only works with any other controller than Push, or with Push in User Mode. If you want to display the parameters on Push when the device is selected, you need to use the live.banks object. In Max you can use the Search function in the menu on the right to get more info on how to use this object.
Interesting way to go about this! This would have been a great help a while ago.
As it was, I fussed around in Max (with which I had absolutely no prior knowledge) long enough to discover that in any Max patch all you need to do is create a live.banks object floating by itself to add parameters in a format Ableton compatible MIDI controllers will recognize (in my case, the Push). Once the object is created you can open an edit window, select from the entire list of visible parameters on the device, and then arrange them into as many banks of 8 knobs as you want. You can even name the banks, which was a big plus for me. I went into all my freeware and premium Max devices (including some from this site) and re-mapped them to my liking. Hope this helps others!
Yes, great tip. Thanks.
if I’m going the live.banks route, how could I assign some of the buttons/toggles on a device to the Macro Buttons instead of the knobs?
I’m not sure I understand your question.
I guess they’re not referred to as macro buttons, but rather Top Display Buttons, under the encoders on a push. I wonder if there is a similar m4l solution for assigning a devices switches to push’s buttons, rather than the encoders…with live.banks every parameter goes to however many pages of encoders…
Life-changing article. Infinite thanks!!
Very happy to hear you found it so helpful.
Great article. What if I would like to change a bpatcher? For example, in Ableton 11 stock LFO I’d love to make the ‘min’ and ‘max’ values mappable. Is there any way to do it?
I think that’s often a lot more difficult, because they often load dynamic content. So I’m sorry, can’t help you there. Try the Cycling ’74 forum or one of the Max for Live FB groups.
Good morning. I discovered the tutorial. I tried. Ableton Live crashed when I tried to save the device. Have you ever observed this bug?
No, can’t say I have. Did you try again?
Good morning. I try to understand. Ultimately, what is the goal of the approach? Is it, at the end of the tutorial, to use an external MIDI controller to drive the device parameter??
It’s to make it possible to MIDI or key map the parameter.
So, my question is that of a beginner in Max for Live: is the MIDI mapping of a parameter of a Max device, similar to the mapping of a UI object (live.dial for example).
I must be missing something… My simple live.button “shows” as being midi mappable (it’s “Visible to Mapping” and “Automated and Stored”), but nothing shows up in Live’s midi mapping list when I associate the live.button and, for example, a track arm. Seems to me that there needs to be a channel and note (or CC) associated with the live.button, but I don’t see a provision in the Inspector to pass a note or cc for parameters.
It sounds like you need to look into using Live’s API if I didn’t misunderstand your comment.