This tutorial shows you in easy steps how the recording process in Live 9 works. If you want to record real instruments or vocals, you should consider getting a decent audio interface as a built-in sound card won’t give you the quality, but high latencies instead which means you’ll hear an annoying delay while recording.
-
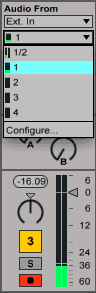
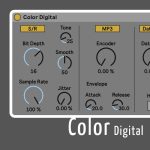
- In an Audio Track choose ‘Ext. In’ under ‘Audio From’ as well as the Input that you’ve connected the cable to on your interface, e.g. 1. Most input sources are mono so if you can only choose 1/2 you need to go to the Preferences > Audio > Input Config and activate the Mono Inputs first. Otherwise you’ll end up with the recorded signal playing back only on one side.
- Arm the Audio Track. Plug your headphones into the headphones output of your audio interface or computer. If you want to hear what you sing or play, turn Monitoring to Auto.

-
- Now test the input levels by playing/singing. You want to get a properly loud signal without having the meters go into the red. Red means it’s too loud and you’ll get nasty digital distortion. If your audio interface has a knob next to the input, you can adjust the input level there. If not, you should have a mixing software in which this can be set. If in doubt, refer to interface’s manual.
- Once you’ve established a good level for your recording you should set the Tempo and Time Signature. You can either enter the BPM directly or tap out the tempo by hitting the Tap Tempo button for each beat. You can click on the Time Signature to change it.
![]()
-
- To record in sync with the tempo, turn on the Metronome.
- You can also set a count-in to have some time to get ready before the recording starts. For this open the Preferences > Record/Warp/Launch and choose 1, 2 or 4 Bars for the Count-In.

-
- You can either record into Session or Arrangement View. The former is good for jamming and trying out ideas in loops, the latter for continuous recordings.

-
- To record into Arrangement View, you only need to click on the Global Record button.
- If you want to record into Session View, there are two methods:
- Click the Session Record button (next to New) to start recording. Click it again to go back into playback.
- You can click the Record button in a Clip Slot to start recording.

- To stop playback and prepare for a new take, press the New button. This stops the clips in all armed tracks, selects the next empty scene or creates a new one if none is available anymore.
- Press the Spacebar again once you’re done with recording. The Clip View at the bottom of Live includes the Sample Editor that now contains the waveform you’ve recorded. To see the Clip View of a clip, it needs to be selected. If it’s not, double-click the clip to make it visible.

Any questions, suggestions or other comments? I’m happy to read them. 🙂
There are plenty more Ableton Live tutorials where this one came from.


20 responses
toll, vielen Dank, auch für blutige Anfänger sehr gut geeignet.
Love everything and all the help that you have given but could you tell me how to save that particular audio.
Thanks in advance!
It’s called exporting and I’ve got a tutorial for it as well: https://sonicbloom.net/ableton-live-tutorial-exporting-audio/
Please help! I’ve set up my new beaut system, but I need help. I can hear the sound and see it moving the levels on the computer. The track is armed. I hit record and the recording starts but it can’t hear my guitar. Help?! I can hear the test tone fine. Only thing I notice it no matter how loud I turn it up the two sound bars on the right don’t move up very much.
Either you forgot step 4 in the how-to above or you need to adjust the input level on your audio interface or its mixer software.
Thanks! Definitely done step 4, I’m using speakers not headphones though does that matter? I’ve tried maxing the volume on the interface and in my computer settings but it didn’t make a difference. I’ll try the software. The volume bars on ableton move when I play and it is recording, but there’s no waveform it’s just recording nothing as it were.
Sounds like the input level is extremely low. Headphones and speakers are about the audio output, but you need to adjust the input level.
Why my audio output not real time with input…I am using tascam ixr audio interface. Please give me any idea.tq
This has to do with the latency your interface creates. Have a look at this tutorial.
OKay, so im trying to record myself, while im listening to the beat i jut made. but its playing through my monitors and headphones. Is there any way to have it automatically switch to only headphones when i start recording ??
No, this isn’t something that is handled by Live. You have to mute the monitor outputs, either on the audio interface itself or in the controller software. Some don’t have this option at all, then you’d have to switch off the monitors.
Whenever i export my audio recording it changes the pitch help
Are you exporting in the same bit depth and sampling rate as you’ve been working in?
Hi!! I have watched almost all the YouTube tutorials and have been to a computer guy to help me. I can record the guitar except it hears me talking which is fine but when it’s directly plugged in I am used to being able to sing along to make sure it comes out right. Also, when I did my guitar track just without singing, I went to record vocals and I cannot hear my first track…I can hear it out of the computer speakers but not loud, but when I have my headphones in the interface I can hear the mic but I cannot hear the track and if I plug them in the computer I can hear the guitar slightly but not mic. All volume is turned up, please help love recording and the software but so wish I could figure it out
Hi Audrey, sounds like you might benefit from a Skype lesson in which I could help you set everything up and get you recording.
That would be awesome!!!! I am on my spring break next week so would Monday the 26th work for me to Skype you?
I’ve sent you an email. In case you don’t receive it, check your spam folder and if it isn’t there either, you can get in touch via my contact form.
I have replied to your email, please let me know if It didn’t get to you:)
I don’t have the option “audio from” or “midi from”. Is there a way for me to edit my settings and get it back?
That most likely means the In/Out Section is simply hidden. Use Cmd + Alt + I (Mac) or Ctrl + Alt + I (Win) to make it visible. You can also click on the first yellow circle in the bottom right of Live that has IO on it.