While working at Ableton’s as a technical support, I came across a lot of users who’d wanted to have their own folder structure in Live Projects. Most of them simply moved around files in the Windows Explorer or Mac’s Finder to achieve this. This approach, however, results in missing samples shown in the Live Set.
To make it work without having Live reporting that media files are missing requires a few more steps though.
Warning:
This only works if you keep the files in the Live Project folder though. If you move them elsewhere, you’ll always see the missing files message at the bottom of Live.
Using Your Own Folder Structure in Live Projects
- Reorganise the files and folders either in the Explorer (Windows) or Finder (Mac) or within Live’s File Browser.
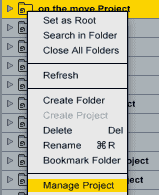
- In Live’s File Browser navigate to the Project folder and right-click (Win) or Ctrl-click (Mac) it.
- Choose ‘Manage Project’ from the context menu.
- Since you’ve moved files within the Live Project folder, Live will indicate that samples are missing. Click on the Locate button.
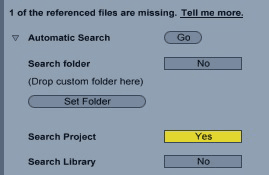
- Click on the little triangle to the left of Automatic Search. Now enable Search Project and Fully Rescan Folders, then click on Go.
- Once the search is complete, Live will have located all missing samples. Now all that’s left to do is to click ‘Collect and Save’ to make sure Live will save the files’ paths of your own structure.
When you export a Project into Live’s Library that has a custom file structure, Live will automatically create the folders with the same name as you had created yourself in the Project. So let’s say, you have created a custom folder called ‘Beats’, then Live will not find a folder of that name in the Library and thus create one. All files from the ‘Beats’ folder from your Project will be copied into the new ‘Beats’ folder in the Library.
Don’t forget to check out the first, second and third tutorial of the same series.
Anything to add or ask? Just leave me a comment below.












2 responses
Hi, I am researching how to organise samples and vst’s in Ableton Live 9 and it all seems straightforward with excellent tutorials such as the one you created here. More problematic is finding out how to organise Max4Live items in a way that I want – for example a folde for M4L tools that deal with video, or M4L tools by effect type. Is this possible?
Best regards
Alan
Yes, you can simply create folders in the User Library from the Browser in Live. So you could name the main one Max for Live and include subfolders according by categories.