Have you ever noticed that a sound is different when you run it through effects at a high or low level? That’s one of the reasons why gain staging is so crucial. However, 80% of the time I’m mixing someone else’s work, I get a mix that’s way too hot. It’s either clipping on the master or even worse, already clipping in individual tracks. Most people simply turn down the master and call it a day, but then wonder why the mix sounds so crappy. It’s no surprise if you overload the effects whether it’s the native ones or plug-ins. Quite frankly, this probably is the source of the myth that Ableton Live doesn’t sound as good as other DAWs.
In the days of analogue mixing, you’d have to find a balance between getting the sound as high above the noise floor as possible while leaving enough headroom to avoid clipping. These days, the noise floor is generally so low, there’s rarely a need to carefully balance the signal-to-noise ratio. Yet, while analogue clipping could sound quite good, this is not the case in the digital domain. There, clipping produces anharmonic distortion which sounds sheer ugly. Think of gain staging as giving you a safety buffer to avoid clipping and an overloaded, too hot mix.
The Signal Flow
Before we talk about gain staging, we should quickly go over the signal flow in Live. I noticed that this is something a lot of users aren’t really aware of. Yet, it’s critical to understand it.
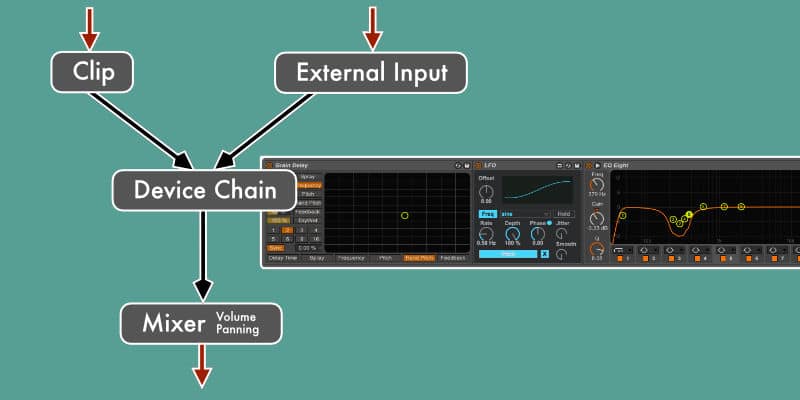
The signal in a track originally comes from either a clip or an input source (external instrument or mic, rerouted track) when it’s audio. In MIDI tracks of course, we only get audio once the MIDI data is converted into sound in the MIDI instrument. Then it goes to the device chain in the track (as displayed in the device view in Live) into the device on the left (or right after the MIDI instrument on MIDI tracks), then through every audio effect in the track from left to right. Finally the sound goes through the mixing element with volume and panning before it is routed out to either the master track or whatever track is chosen in the Audio To setting.
Take it Down
 So if the signal comes in too hot from a clip, simply turning down the volume won’t cut it. That’s because the volume comes last in the signal flow. A lot of the clips shipped with the Live Library or available for purchase are very loud and need to be adjusted. The same goes for presets of MIDI instruments. Use the volume setting in the Live instruments or plug-in for this.
If you’re recording an external signal, make sure you’ve set the volume to a decent level that avoids clipping even when the sound gets much louder all of a sudden. That’s especially important when you’re recording vocals as the volume of a voice can fluctuate between a whisper and a scream. The rule of thumb is to keep the average volume level at about -10 to -12 dB. Don’t forget to check the mic positioning in terms of distance to the computer and other gear that might introduce noise. If you’re recording something that creates noise on its own, make sure that the sound level is well above the noise floor without clipping.
If you’ve already got a clip in your track in Live, you could of course simply reduce the gain level within the clip. However, this is not a neutral operation in Live and might change the sound. Instead, add the Utility effect as the first device in your effects chain in every track and adjust the gain accordingly.
Clipping must be avoided on all tracks that are routed out of Live. This is first and foremost the master, but this depends on your routings in your Live Set. Don’t forget to keep an eye on the master volume. It should not only stay in the green, but leave a headroom of about -3 to -6 dB for mastering later on.
Don’t Forget the Effects
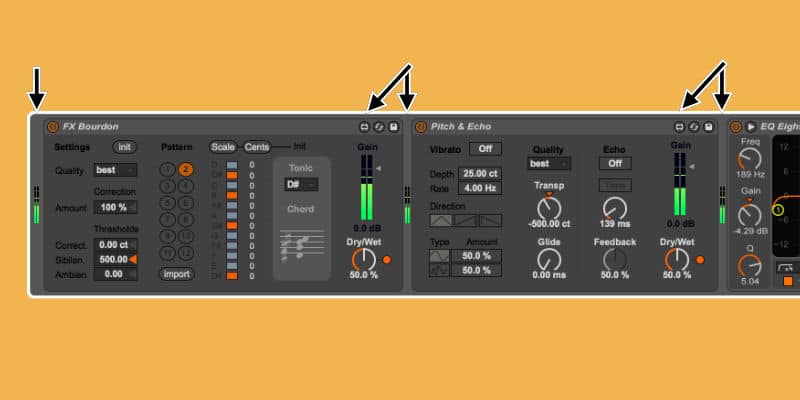
Now that we’ve adjusted the volume of the clip or other input source, the signal will move through the various effects sitting on each respective track. Not every effect will output at the same volume level as it has received it. Very often intentionally so. Also here, we have to ensure that the levels are sensible. Luckily, we have small meters between effects showing if the volume levels are in the green or red. Most effects, native Live ones or plug-ins alike, offer output level controls. Some even for the input as well. Make use of them to boost or attenuate to achieve a good level.
In music, there are always exceptions to the rule. Sometimes you need to run a signal too hot to achieve a specific sound. If so, just make sure that in the end at the output no clipping occurs anymore.
A little tip: If the volume of your track seems too quiet overall, leave the faders in Live alone and instead adjust it via your audio interface, its control software or your monitors. Leave “the make it loud” bit until the mastering stage.


51 Responses
Hi there!
nice article.
I was just wondering what you exactly mean when you say “you could simply reduce the gain level within the clip. However, this is not a neutral operation in Live and might change the sound”?
Cheers
I assume you’re wondering about the second sentence mostly. There’s a whole chapter on neutral and non-neutral operations in the Live manual, that should clarify your question. https://www.ableton.com/en/manual/audio-fact-sheet/
Thanks for that link. I’d never read that section of the manual before (shame on me lol), so there were a few things in there that I wasn’t aware of previously. And I’ve never commented on any articles on here before, I don’t believe, so I’d also like to thank you for everything you do to help us out. You always have awesome, informative articles, and the amount of extremely high-quality freebies you give away is mind-blowing– not to mention the amazing products that are for sale on here, which are always brilliant. I’m sure I speak for pretty much everyone when I say thank you! Your hard work and generosity are very much appreciated!
Aw, thank you very much. 🙂
Changing gain is ‘technically’ non neutral because it will result in the inability to cancel the signal using an inverted phase copy of the original. It does not however colour the sound in the way we would assume any other non-neutral operation might. So it does change the sound but only in volume, as such I always start with the first possible gain in the signal path (usually the clip gain for audio and the instrument volume for MIDI) and work forwards from there.
Slightly different approach, but same result. I prefer the Utility effect to set the initial volume. I find it more clearly laid out. It’s also a good reminder where I left off, if I’d been working late and didn’t make it through all the tracks.
Great tip – don’t think this is talked about enough. Probably worth mentioning using limiters in the chain to help with spikes caused by effects racks or odd harmonic distortions in midi instruments.
I haven’t mentioned limiters and that for a reason. A lot of producers who don’t do gain staging will just drop a limiter on every track and squash the waveforms into sausages. I use lots of real instruments and voice and hardly any limiters or compressors. Limiting and compression are overvalued precisely, because so few people use gain staging.
Agreed! I almost never use the faders in Live and the only compression or limiting I use is in my final mastering chain (unless I’m dealing with a really dynamic drum sample that needs to be tamed before being put to use). The Utility device is my best friend. Basically you can manage a rough mix across all your channels before you even _think_ about what’s happening on the Master. I find it a huge time saving mechanism. My effect rack for mastering is practically drag and drop. Minor adjustments if a particular effort is especially quiet or especially loud, but beyond that, just push it into the -3 to -6 range and call it “done”.
I do use the faders, but I’m working with lots of recorded instruments and voice that of course have more dynamics than MIDI instruments.
As always, great stuff. I personally am guilty of thinking that Ableton is not as good sounding as other DAWs. For some reason I find it harder to gain stage and mix in general in Live and tend to bounce out to pro tools. I am currently trying to mix a project in Live though, so I’ll have to remember the utility effect. Thanks for this. There might be people who know more about Live than you, but if so they’re not writing on the internet.
Aw, thank you. 🙂
There is no problem with tracks that are in the red.
From Live’s manual:
“Because of the enormous headroom of Live’s 32-bit floating point audio engine, Live’s meters can be driven far “into the red“ without causing the signals to clip. The only time that signals over 0 dB will be problematic is when routing to or from physical inputs and outputs, like those of your sound card, or when saving audio to a file.”
https://www.ableton.com/en/manual/mixing/
If you put a sample on an audio track, add a utility with +35db of gain, then send the audio to another track with a -35db utility, it will phase out completely with the same sample on a third track.
Yes, but that isn’t the case for all the effects on the track which will change the sound (Live devices or plug-ins). And you seem to be forgetting that recording is already part of the gain staging process, so it surely matters there. Also, at some point you will have to route the audio out through physical outputs, so why not consider this before it becomes an issue which I’ve seen time and time again.
Thanks for great articles!
I switched to Live from Logic and I’m missing one crucial mixing tool in Live – pre-fader metering. It’s one of the most important mixing tools for me and it’s not available in Live. With pre-fader metering, gain staging is very easy and precise. Small meters in Live, between plugins, are too small for me.
Do you know if pre-fader metering will be available in one of the future version of Live or if there is any trick how to achieve it in Live.
If you have Max for Live, this should do the trick: http://www.maxforlive.com/library/device/2980/basic-meters
Thanks! Hope pre-fader metering will be available in one of future versions of Live…
There is pre-fade metering – just not all tracks on show at once.
It is shown in the device view between each device you have in a chain (or just by itself, if you have none)
Yes, and Mario said they were too small to be used as proper pre-fade meterings and I agree.
I wish Ableton Live had a default so set the dB value when creating channels, let’s say I would set it to -6dB by default, not 0dB which is the case just now.
It does when you create your own default tracks. Change the level to -6dB, then right-click on the track title and choose ‘Save as Default Audio/MIDI Track’. The MIDI track requires an instrument for this to work though and it will be part of any MIDI track you create. This goes for any devices added before saving it as a default.
Not quite.
You can delete the instrument prior to saving as the default MIDI track.
You’re right. It maintains the volume setting when you add an instrument.
The issue with hot signal has really to do with plug-in headroom, if a plugin has a small headroom to operate within, let’s say a vintage compressor, it can’t really fully analyze and do its job. The output from such hot sources also has very small dynamic changes — looks like a brick wall (and sounds like one) compared with the holy grail of audio output looking like a fish comb.
Yes absolutely, but also all instruments and effects of the used DAW.
I’ve read this article and honestly watched many videos and stuff trying to learn proper gain staging so I can do proper mixing and also trying to learn mastering at the same time! From everything I’ve read and also tips I’ve received I know I’m supposed to use a utility on every track as the first thing (which I’ve got) and my understanding is to pull the gain down (pure signal no eq’s or anything else active, volumes all at unity gain 0db) all on everything until the master bus reads a peak of no higher than -6, I then activate all my stuff on every track and the max readout doesn’t peak much higher than that (although there is one more peak that takes it to -3) so I start using track volumes to pull it down but by the time I’ve got all the dynamics in place I’m peaking no higher than -13.5, average about -15 for most of the track, probably worth mentioning my highest individual track volume is -6 as well and last time I exceeded that it sounded horrible…. (feeling like I’m having trouble mastering it with that much headroom) am I doing something incorrectly at the mixing stage? I can’t find answers anywhere, even though people are swearing that they like this much headroom when mastering!
I’d recommend grouping tracks (e.g. all synths) to create submixes. Mix the tracks within each group with each other until the levels work, then most of the time it’s only about balancing the various submixes. Learning to mix is enough at first. I focused on that and had someone else master my work. EQing is quite important and it takes a while to know what to do and be confident about it. Just hang in there, it takes time to become good.
If it feels like too much headroom when you have a master output of -6dB, try more than one compressor with gentle settings in a row.
Excellent article that explains subject clearly. I think alot of people don’t realise your fader movement is after the clip/midi and effects chain. Unless of course those faders are going into a buss with fx, which moving the fader will affect those levels. Use utility to tame the level of sample and use the faders to mix. Create groups after you like the sound of your mix to prepare for master.
This was a big help for me, thanks@
I’ve always done gain staging in a different way but, i hadn’t read any articles in it. Just used what i learned ages ago while teaching myself (pre massive info on the internet). I’ve been running from main source to fader at -3db. From there usually into an EQ (unless i’ve used a utility to mono something out from original stereo). In EQ adjusting output after sculpting, and outputting from there at as close to 0db as posible withou reaching it (sometimes something like 0.05 – 0.10 dbs. Usually going into the compressor (or any other processor) after that and after processing, again outputting into fader at as close to 0db as posible without actually reaching it. I was asuming that you had to calibrate each channel fader to ad close to 0db as posible (after processors/fx) in order to mix at lower volumes and also adjust your faders to the actual meter read-outs. Can you please help me understand this better? What is the optimal input volume of each of Ableton’s native plug ins? EQ 8? Compressor? Multiband Dynamics Compressor? Limiter? Etc. Thank you for your help and time. Cheers from San Juan PR. PSi always make sure my master bus is at or around -6db pre master channel processing with its fader at unity.
The approach you explain is the one for analogue gear, since a lot of hardware created some noise and analogue clipping can actually sound rather good (unlike digital clipping), you’d record as loud as possible without it clipping too much, so you’d end up with as little noise floor as possible. With DAWs this isn’t necessary anymore, and it’s even recommended to record audio roughly at -10 or -12 dB.
Adjusting the gain of the effects to keep the same volume is useful, because it’s easier to compare it to the sound without it when you bypass it, as a higher volume changes sound in our perception. Most digital effects including Live devices have a pretty wide sweet spot (where it sounds good), so often only clipping will be problematic.
Super helpful article, thanks!
You have a great website here.
I have problems with this still. Even with my levels in the green across the signal chain my master is banging in the red. It seems like a mathematics where added tracks to a song keep adding up the dB in the master. This is REALLY frustrating for a novice to mixing. How can do know a good starting point of individual tracks if they keep adding up?
I find Ableton Live horrible unfocused on this issue. In this day and age how hard could it be to make a pre set adaptive gain set utility on each track and at the end, (floating point, with healthy headroom)
And like someone mentioned, those miniature meters that one cannot enlarge is pretty annoying.
Ableton is so smooth on something and so crappola on others ????
Those question marks at the end.. I’m sure I stuck a smiley on there 🙂
Yes, the loudness of the tracks adds up in the master. I tend to start with the tracks roughly peaking at -10 to -12 dB each, but it depends on the amount of tracks in your set. The most important thing really is to develop the habit of continuously checking and adjusting the levels. I do that already while producing. Unfortunately, it’s become customary to have presets and clips be as loud as possible. It would be better if they were already gain staged. If you have Max for Live, there are some free devices with bigger meters on MaxforLive.com.
Thank you so much for taking the time to answer 🙂
There is just so much to learn from this website and Ableton just keeps getting more fun the more I understand. Stuff like this is a typical obstacle when starting out.
So do you keep the -10 to -12dB after each module throughout the signal chain? Or does that depend on the sound treatment?
E.g. I find distorted audio sound much better when loud, -but then I’m quickly in the red. The same goes with a punchy compressed kick or snare.
Have a nice day
No, that’s just a rough starting point. Not every track will have the same level once you’re done mixing. Some elements need to be louder than others. Go by what sounds right to you and keep an eye out on the master. If the track is supposed to be mastered, ideally the level on the master shouldn’t exceed -6 dB.
If the audio isn’t loud enough, turn up the volume on your interface, not in Live.
Thanks again!
I like your approach to mixing. I’m an 80s child and I must say I find todays pop-music really fatiguing on the ears. It’s all squashed to death. While the records I grew up with, I could play over and over and over. There was way more air to “breathe” in the mixes. It would be really great if maybe could school us on this, (pleasant EQ, careful compression etc..) . I’ve seen your Oblique Strategies and they’re inspiring.
NB: do you have any links of examples of your mix and mastering work?
I’ll see what I can come up with. Might take a while, since I really gotta finish my own music first. I’ll send you an email with examples.
Great article. I come back to it quite a lot for reference.
I put a utility at the beginning of each device strip and then the Max4Live Swiss Army meter after it, and then another swiss army meter at the end of all the plugins so i can see any gain difference from the plugin chain. it shows larger meters and the level in big font for easy reference
Hey – love your work – and certainly helped me get into Ableton faster in many ways.
This article, among other work of yours, also inspired me to create an open-source repo on GitLab for a standardised starter setup User Library & Templates.
Feel free to share if you like and think it might help others: https://gitlab.com/ableton/ableton-user-library/
Feedback on it welcome too if you’re interested 🙂
Wow, this looks pretty extensive. I’ll definitely check it out.
Great article and super helpful, thank you! I’m just discovering SonicBloom and I’m so glad I did. Setting all of my default tracks to start out at -12db.
Do you keep your master fader always at unity throughout the mixing process? I sometimes have problems with exports coming out super loud even though they sound fine in Ableton. When exporting a mix to be mastered, would you say aiming for around -6db with the fader at unity is a good benchmark?
Thanks again!
Yes, I always keep the master set to 0 dB and aim for about -6 dB.
Fantastic article, thank you.
There is one thing I’m still not entirely clear on. You say “if you’ve already got a clip in your track in Live, you could of course simply reduce the gain level within the clip. However, this is not a neutral operation …. Instead, add the Utility effect”. The first comment on this article asks about this and you referred them to this part of the Ableton Live help manual: https://www.ableton.com/en/manual/audio-fact-sheet/
So I read that, but it seems to say that all gain changes are technically non-neutral, which leaves me a little unclear on the difference between changing the gain of the clip, and changing the gain via the Ultility effect. I’m guessing the former is more destructive, but wanted to ask out of curiosity. Thanks
This is just to avoid any audible artefacts that could potentially occur if the clip is also using warp markers (pretty unlikely – so maybe it’s more of a habit for me). Usually reducing the clip gain should be fine.
Thanks for this article Madeleine! So when you mention that we should keep the average volume between -12 db and -10 db in each individual track, that is the light green meter that is shown in the mixer and not the peaks (darker green) right? And we should keep that level of between -12db to -10db throughout the insert effects correct?
I found all your articles super helpful for me so thank you :)!
Yes, the light green meter. That’s just a rule of thumb though. The important bit is what the summed tracks reach together in the master track.
Hey Madeleine I am confused as to what my levels need to be around on my separate channels should I keep them below -3. I have read a lot of articles that mention my levels need to peak around 18dbfs is this equivalent to -3 db. Thank you for taking time to read ?
It all depends on the number of tracks you have. The rule of thumb is that the sum of them all on the master track should stay below -6 dB.
In a 32-bit floating-point system, the dynamic range (which is a concept related to headroom) is incredibly high – theoretically up to around 1528 decibels, which far exceeds the range of human hearing and even the loudest sounds known to occur in the universe.
Yes. Not sure if you think your comments corrects anything I wrote (it doesn’t) or if you just wanted to add this.